Pages

Showing posts with label Sally Hansen. Show all posts

Thursday, December 15, 2011

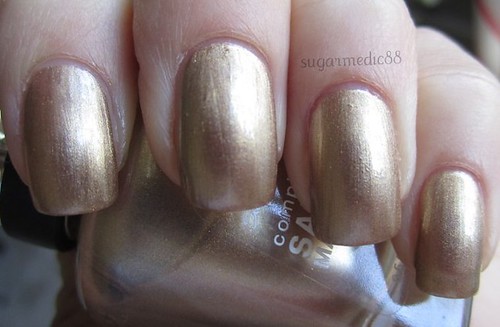
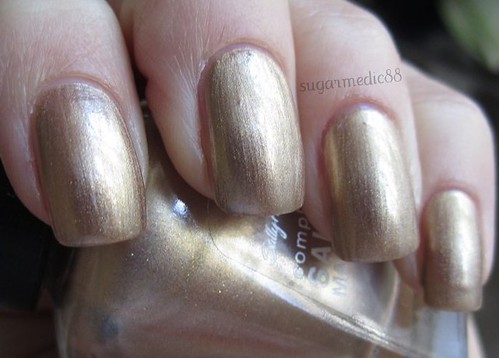
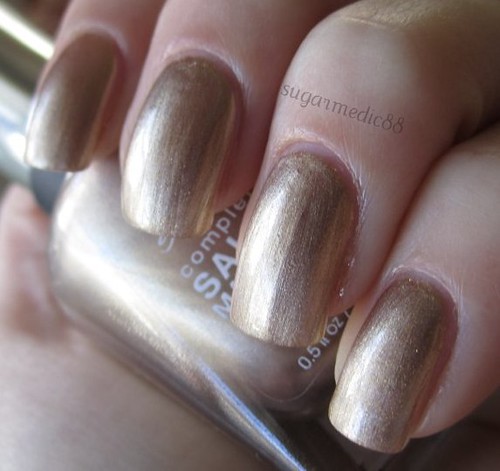
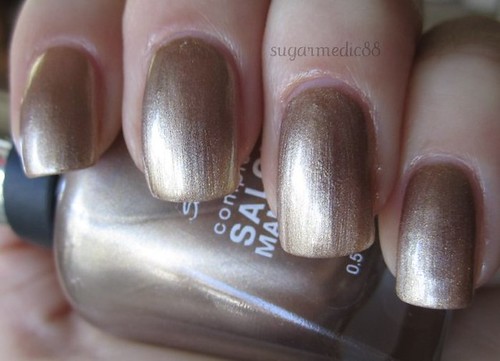
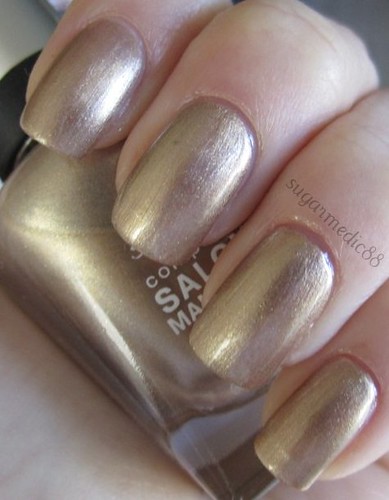
Sally Hansen Gilty Pleasure

Can someone tell me why this is spelled gilty and not guilty? I'm not getting the reference. Luckily, that's the only thing that bothers me about this polish! I think it's lovely...


Gilty Pleasure 4

Gilty Pleasure 1

Gilty Pleasure 6

Gilty Pleasure 5

Gilty Pleasure 2

Gilty Pleasure 3


2 coats Sally Hansen (Complete Salon Manicure) Gilty Pleasure
1 coat Poshe

This is a VERY nice shade of gold. It's very "real" looking. Instead of being an "artificial" yellow gold, it's more of a brassy gold. Like an old brass, not with a ton of luster or shininess, but an aged, antiqued brass while still holding true to it being gold. It's metallic as opposed to a shimmery or glitter gold. I don't know how it'd be on different skin tones, but I imagine it won't clash too badly with anyone.

The formula was lovely. It does show some brush strokes, but only when you look closely and concentrate. This was a very forgiving polish. It stayed where I put it despite my numerous brush strokes I used on each nail. No streaking, was opaque in 2 coats. Very nice to work with.

Sunday, September 11, 2011

Revlon Top Speed Jelly... Not Really A Jelly

Keepin' this short because I wanna focus on describing this polish. I was under the impression that Jelly was a jelly. Well, I don't really know, but it's interesting.

Direct Sunlight
Revlon Jelly

Revlon Jelly


Shade
Revlon Jelly

Revlon Jelly


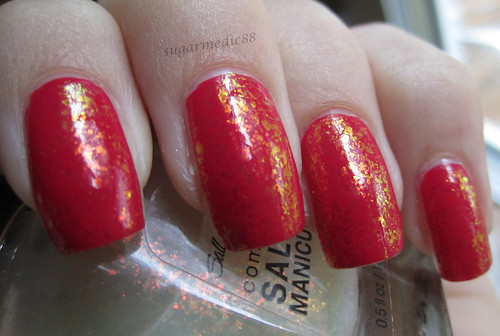
And here's it with Hidden Treasure
Sally Hansen Hidden Treasure over Revlon Jelly


1 coat (yes, ONE) Revlon Jelly
1 coat Poshe
(Last photo has 1 coat Sally Hansen Hidden Treasure)

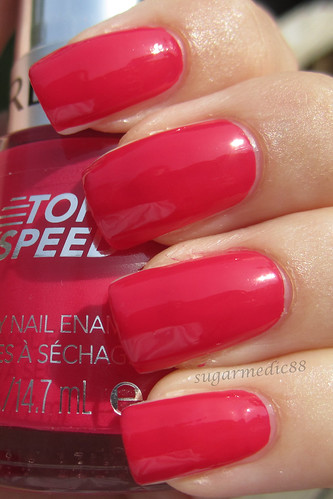
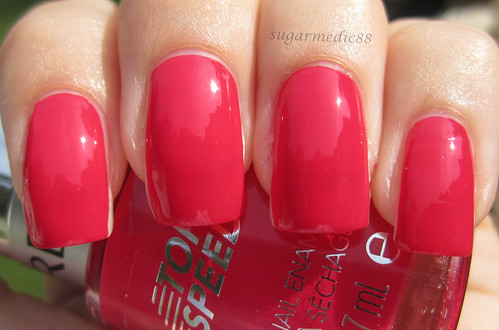
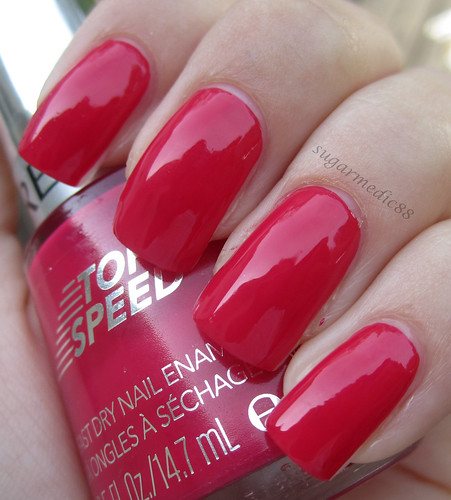
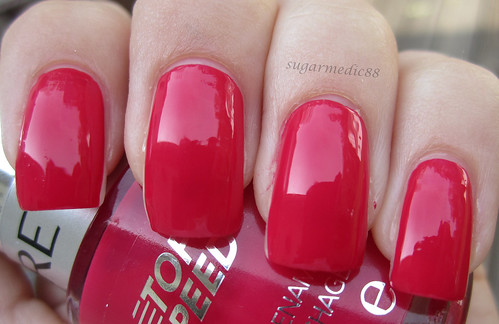
I usually never put direct sunlight photos first, but they were (IMO) def the most gorgeous. Color-wise, it's a bright red based pink that can appear to be red on the nails, though in the bottle it's clearly pink.

More importantly, let's discuss the finish and whatnot. So. Is it a jelly? I'd say maybe? but I don't think so. What makes me say maybe is that it does have a "squishy" quality, but it's more shiny than squishy (even without a top coat). It's not an obvious creme. But at the same time, it's just not that interesting. It doesn't have that opacity shift that jellies have that make it look almost glassy. Does that make sense? It doesn't have depth the way a true jelly does. I think that's partly because it takes only ONE freakin' coat and it's perfect.

So let's talk about formula, because it's so odd. It reminds me of a thick creme polish that was thinned. But not thick as in it was getting dried out because its old, thick like the formula was just bad but thinner made it "puffy". The consistency was puffy. I think that's what takes away from it being a jelly. Anyway, the brush seemed to collect SO much polish. That made it super prone to easily flooding your cuticle. If you're not good at doing a gap, stay the heck away from this. You'll frustrate yourself to no end because your cuticles will be so full of polish. I actually had to redo a nail. It's been like a year since I've actually had to redo a nail due to flooding... and it was on my LEFT hand!!!!! I was painting with my dominant hand!!

However, back to the one coat thing. Legit, there is absolutely no reason to do a second coat. It was so evenly pigmented, there was no streaking (you couldn't make this polish streak if you tried), it was amazing.

The other thing that frustrated me was the brush. If you have straighter, not so curved cuticles (my cuticles are fairly rounded), the brush will work fine. But for me, trying to get a nice swoop at my cuticle was not easy. The brush wanted to keep it completely straight. And because of the high risk of cuticle flooding, it was difficult to try to get it even near my cuticle without drowning it.

Ultimately...
1. The TRUE one coat factor was nice.
2. I was expecting more of a jelly, and it was disappointing to not have that.
3. I wish it looked more pink than red (because I really don't like red nails on myself).
4. The cuticle flooding was a PITA.

Monday, June 13, 2011

Restoring A Hidden Treasure

... literally!! I posted this on MUA, but I'm making it a post here, too.

I haven't posted in 4 days because I had been at work and ended up working late every day. And I had the most traumatic nail break I think I've ever had in my entire life. More on that in another post, but my finger is currently just bandaged because I have not a clue what to do about it. Anyway...

I was at a Walmart on Thursday that I just never tend to go to. It's definitely near me, in the city that I work and everything, but I just never go to that one. They had an awesome Wet n Wild display where I grabbed Gray's Anatomy. I hadn't found that ANYWHERE in my area. They also had bins of "clearance" cosmetics (which the Walmart I usually go to NEVER has). They were red tagged, but I know that at Walmart, red tag doesn't necessarily mean clearance (I hate how sneaky that is). But these red tags were all 50% and some were legit cheaper than they usually would be before the 50% off.

So anyway, I saw some SH CSM but I already had them. And then... I saw it... Hidden Treasure!! I had no idea this was sold at Walmart. I was under the impression that it was only drugstores, particularly Wags. So I'm super excited. One problem though. It looks like this:


So in the post I made on MUA, I was asking if people thought I should use just thinner alone or if I should add some clear polish. I had been aware of this post by Scrangie for quite some time, and I myself have witnessed the wonders of thinner. However, I wasn't sure if I should be adding something else because HT is more of a top coat while the polish(es) Scrangie restored were actual pigmented polishes. My bottle is just filled with clumps of flakies, so I'm afraid if I add pure thinner, the consistency I'd end up with would be horribly off.

Ultimately, I decided to start with thinner alone and not fill the bottle completely. My thought being if the consistency is that off, I could add clear polish or I could just leave the cap off, let the thinner evaporate, and start over.

So here's HT after the first round of thinner 10 minutes into the thinning process:

Here it is after being shaken


I turned it upside down so you could see how much is still clumped at the bottom.


Some of the flakies have started to break away from the giant clump.


The brush is already starting to look normal again!!


After an hour and a half letting it soak in and intermittently shaking it, I decided to add more thinner because there was still a good deal that was still clumped at the bottom.

You could even see the ball stuck in the clump.


But overall, almost all of the flakies had started to unclump!!


Two hours in I decided to top it off with thinner because pure thinner was clearly the best option. Here's the end result several days later (there was no real change from the day after I added thinner after letting it sit overnight, and when these photos were taken).

This is before you shake the polish. I don't know if unthinned HT does this, but you can see how the flakies have fallen down and there's a cloudy area at the top.


And this is after giving it a couple of shakes just as you would a normal polish. All the flakies are evenly dispersed.


And the brush is now completely normal!!


So thinner is amazing. Best thing ever. If you're curious, I used Beauty Secrets from Sally Beauty Supply, which can be found online here (my bottle looks different than the one in the photo). It's also sold in stores, which is where I picked it up.

I did mix it around with a toothpick, but not too much because I was afraid I might destroy the flakies. Overall, looks like it came out gorgeous!! I haven't tried it on my nails yet (obviously, considering I've been at work), but I did swatch it on a nail wheel:

Left is Sinful Black on Black
Right is OPI Mermaid's Tears

Sunday, June 5, 2011

Spring Wedding Nails

This was from my friend's wedding yesterday!! This is actually the same friend whose wedding I went to in NYC. So the night before the wedding I water marbled one of my friend's nails and it was super fun! She was totally into it and loved doing it!! They came out awesome, I'll try to get a picture.

So I had to decide what to do for my nails. I slowly started to piece together my ideas to create a cohesive look. All of my friends know I'm a nail fanatic (I was with the bride and the wedding party last night when I water marbled our friend's nails), so I know they're expecting something awesome. My dress is not a solid color, so I didn't want to do anything too flashy. I was contemplating doing a complete water marble, but decided that was too much for me to do today, and I knew I wanted to wear Essie Mint Candy Apple. So the game plan became MCA on all nails but my ring fingers, which will be water marbled to match colors in my dress. I was going to water marble my thumbs, too, but one of my thumbs is getting a fake nail, so I decided not to bother. I'm actively doing my nails as I'm typing this, so I'm also considering possibly Konading some or all of my other fingers. If I do it, it'll be in white and something subtle, not a full nail design. So let's see what I ended up with...


Close-ups of the Water Marbles


2 coats Essie Mint Candy Apple
Water Marble:
Sally Hansen Xtreme Wear in White On
Essie Mint Candy Apple
Essie French Affair
1 coat Poshe
Konad:
Konad White with Essence stamping plate (design also on Konad plate m4)

I had been reluctant to use MCA because it tends to be difficult to work with. This time, though, it really wasn't that bad. Probably because I expected it so I was careful. It's one of those that tends to get dry on the brush so it becomes difficult to apply. I find if you frequently let it rest back in the polish, application is much better. It did have a little drag, but I was able to get around that the majority of the time. It was somewhat uneven (not streaky, just uneven), but that was resolved with a top coat.
MCA is a pretty well known color, and despite the application problems, I still think it's worth it. It's such a bright, fun turquoise that leans more blue than green. When I think "Mint", and I think green, but this is definitely more blue.

The water marble was great, but there were bubbles. Luckily only one on each nail is actually visible when you look at the nails in real life, and even then, they're so subtle. The colors spread perfectly and easily in the water, even though MCA is pretty thick. I did not expect it to spread NEARLY as well as it did, which further proves each polish is different when it comes to marbling.

I decided to go with a simple Konad design on my thumbs just to add a bit more, and so you could notice it when I text on my phone.

What was awesome, though, was my friend whose nails I marbled the night before. She was at the pasta station getting food and the servers started asking her about her nails!! She told them I did them and they asked what salon I worked at because they LOVED them... heehee. That made me feel kinda awesome lol.

Here's what I wore that was the inspiration for my nails:

Wednesday, June 1, 2011

Please Don't Use This Product !! :(

I just have to warn you guys. I'm so, so sad about what happened to my nail, I don't want it to happen to yours. Two weeks ago, I posted about my broken left thumb nail. All was going well with my silk wrap until another traumatic thing happened. On my 16.5 hour work day, I FINALLY punch out, reach into my pocket to pull out my phone, and my thumb nail gets jammed and the silk wrap breaks.

Side note... Seriously?! Right after I punch out?? It lasted an entire freakin' shift carrying gear, carrying patients, opening doors, typing my reports, etc. but my dumb nail finally has to break AFTER I punch out and when I try to get my phone out of my pocket. Ridiculous.

Anyway, I've had this happen before. I just soak off the wrap and put on a new one. No harm done. Well, I had recently purchased Sally Hansen Insta-Fix Nail Repair Kit because it was 75% off at CVS.


It was rated pretty well on MUA (it was 4.6/5 and 100% would buy again before I added my rating and review) so I figured instead of putting on another silk wrap, I'd just use this.

It went on a THOUSAND times more easily than a silk wrap. I just painted glue over the break (I took off the silk wrap and started fresh), then sprinkled the acrylic powder over it. It dried quickly and I was able to buff it to a smooth finish. I thought I had found the greatest nail repair product ever!!

But then...

It became SO dry and brittle despite my frequent moisturizing. Finally, it cracked. And when a silk wrap cracks, it usually doesn't continue the crack in the nail. Oh my goodness did this Insta-Fix continue the nail break. Parts of the glue/acrylic started to crumble off and it looks awful. I got home and soaked and soaked and soaked the repair in acetone. I used the foil method and everything. It wouldn't budge AT ALL. My poor cuticles took such a beating being wrapped in acetone and tin foil for so long :( I tried my best to gently break off more of the repair, but it seemed like it penetrated into my nail. When it finally started to loosen, I was able to get it off... and it SHREDDED my nail and took a whole chunk of it with it. SHREDDED it. Like paper thin and shredded. No clean, angular break. It was like when you go to bite a piece of celery and it leaves all of those strings and jagged pieces. I wish I had taken a photo of it, but I was just so livid that I didn't think about it then. I just wanted to fix my poor nail :(

Wanna see the damage...


:( Needless to say, I'm not thrilled. I couldn't even get the rest of the repair off. I kept trying to soak it and it wouldn't work. And I'm too terrified to try to pry it off. It DESTROYED the part that came off, I'm not taking chances right now until I figure out some other way to get it off.

My girlfriends wedding is Saturday, and I really wanted my nails to look great. So it looks like I'll be using a press on nail for occasions like that until the nail grows out. No way am I cutting down the rest of my nails that short. No freakin' way. I can't even get my thumb nail even because the break was so low that I'd have to file my skin. Gross, and not gonna happen.

So ultimately, do not get near this stupid product, and definitely don't let it touch your nail. It's not worth it.

Does anyone have any idea how I can get the rest of the acrylic repair off? When I put on the press on nail, I'm going to need an even surface, so I have to get it off by Saturday. Help??

Friday, May 13, 2011

Golden Cinnabar with OPI Silver Shatter

My first use of Silver Shatter!! As I've said before, I'm not a huge crackle fan. Black Shatter just didn't do it for me. And I'm convinced it makes my nails look fat. No, really, I swear. But did that stop me from speeding out to go pick up Silver Shatter (and 3 other polishes from the Pirates of the Caribbean collection)? Umm, nope. But I think that's a good thing because I actually like Silver Shatter. Maybe because it's spring, and black doesn't scream "spring" to me the way this silver does. It keeps the nail light and pretty. I'm hoping I like Black Shatter more in the fall. I just tend to follow seasons when I wear polish. In the fall/winter, I'm in the mood to wear darker colors. In the spring, I like pastels, and in the summer I like brights. Slight variations here and there, but you get the idea.

So obviously when I picked up Silver Shatter, I had polish on. So when I got home, I couldn't swatch it on my nails. In hindsight, I could've used a nail wheel, but eh. Oh well. However, my sister was at home with naked nails, so I took advantage of them. I painted 10 random colors on her nails, and Golden Cinnabar was one of them. This ended up being one of my favorite combinations!!


Closeup


2 coats Golden Cinnabar
1 coat Poshe
1 coat Silver Shatter

I know I said I loved this on my sisters nails, but I don't know how much I loved it on mine. Maybe because it didn't crackle super well on all nails, or because my nails are much longer than my sisters.

Thursday, May 12, 2011

Sally Hansen Nail Prisms in Golden Cinnabar

I was initially planning on wearing a holo, but because I was doing my nails before bed, I didn't want to take the chance of it being overcast the next day (By the way, it was amazingly sunny today). So I was going through some of my older, "not salon brand" polishes, and I came across Golden Cinnabar. I bought this about a year ago from Dollar Tree and it came packaged with Sally Hansen Reddy to Mingle. So technically, this cost me 50 cents!! Yay for cheap polish!! And for the record, when it comes to polish, expensive does not equal good quality and cheap does not equal bad quality. You should never assume that because you're paying $8.50... or $14... or even $25, you're getting the best quality polish you can find. You can easily find polishes for $1 that are amazing all around, and you can also buy $25 polishes that are awful in every way. So keep that in mind when you're choosing a polish.

And for the record, despite that I've had this polish for about a year, this is my first time wearing it!! One of the things I love about duochromes is that means I get to take a ton of photos!! Woooooo!!

Sally Hansen Nail Prisms Golden Cinnabar Swatch

Sally Hansen Nail Prisms Golden Cinnabar Swatch

Sally Hansen Nail Prisms Golden Cinnabar Swatch

Sally Hansen Nail Prisms Golden Cinnabar Swatch

Sally Hansen Nail Prisms Golden Cinnabar Swatch

Sally Hansen Nail Prisms Golden Cinnabar Swatch

Sally Hansen Nail Prisms Golden Cinnabar Swatch

Closeup
Sally Hansen Nail Prisms Golden Cinnabar Swatch

2 coats Golden Cinnabar
1 coat Poshe

The Nail Prisms were probably some of the most awesome polishes put out by Sally Hansen. To some, they're probably some of the most awesome polishes put out by ANY nail polish brand. Nail Prisms have since been discontinued :( but you can still find them randomly at discount stores, dollar stores, or online. Some were more holo, some were more duochrome, but regardless they are all gorgeous in their own right.

Golden Cinnabar is a bronze-y/copper-y gold, coral-y rose duochome. The description I give it makes it sound pretty ugly. Haha. But I think it's super intriguing. I'm generally lucky in that I rarely come across a polish that really looks awful with my skintone. Either that or 1. I don't buy colors that clash with my skintone or 2. I just pretend all nail polish looks good on me. Regardless, I can see that this polish may not work with all skintones. I do think, however, that it is a polish that can be easily worn in all seasons.

The formula was great. It seems very thin, but it's totally opaque in 2 coats with no brush streaks. Absolutely no complaints with the formula and application. I'm satisfied :)

Also, I don't have it to compare, but it looks very similar to Nubar Stardust. Maybe a dupe or at least dupe-ish?