Pages

Tuesday, June 28, 2011

French Affair with Sticker Decal

Yesterday's mani was just simply Essie French Affair, and I wanted to do something simple to it today. I considered Konad, but wanted a bit more. Nothing flashy, though. I wanted to keep it fairly simple. So I ran down to Walmart and picked up some Nail Art stickers by Kiss for less than $2 and figured I'd give them a shot.


3 coats French Affair
1 coat Poshe
Sticker from Kiss

Well it's a good thing I got those few photos before I put a top coat on the sticker. The photos aren't the best because I had just gotten out of the shower, so my nails were a little swollen.
My first experience with the sticker was decent. It has a clear backing so even though it looks noticeable in the photos, it's not noticeable when you look at it in real life. The instructions mention using a Nail Art Applicator. I didn't use that, just used my fingers. The only problem I had was once it's down, it's down. One of them got about halfway stuck and I realized the placement didn't quite match my other nail. I tried to pull it back up, but it tore off the piece I was holding, so I just stuck it down where it was. I suppose that's a good thing when it comes to lasting, though. Maybe that would imply that it won't peel up within a day.

So, here's where things went wrong. I didn't initially use a topcoat, even though the instructions state that you should. I got home from the dentist and realized the little silver balls looked dingy and not really shiny at all anymore. I was going to say I used lotion, but I used it BEFORE putting on the sticker, so I really don't know why they became dull.
Once I got home (about 2 hours after application), I decided to use a top coat to make the silver balls shiny before I took better photos once my nails de-swelled... what a horrible mistake.


This is with 1 coat OPI Top Coat. The silver color from the balls smeared ALL OVER and left portions of the balls just clear. Wow I'm not impressed.

Here are the stickers I bought


Here are the instructions

Monday, June 27, 2011

Essie French Affair

I'm mad at myself for not painting my nails on Sunday. After work on Saturday, I went over to a friend's house for dinner and then woke up early the next morning with no time to paint my nails. I went to the Chief's Show, which I'm sure will interest no one who reads my blog!! Haha. But it's basically a fire expo with lots of fire trucks, ambulances, vendors, etc. Way more fire than EMS based, and I'd prefer it the other way around, but I had a nice long talk with the rep from the company who makes our stretchers, so that was entertaining. Saw a few ambulances up there that I have personally worked in, which was also neat.

Anyway, back to nails. So I had intentions of doing something really awesome and fire/EMS related. Didn't happen at all. I went with naked nails :(

So when I went to paint my nails last night, I knew exactly what I wanted (something that hasn't happened for a while). Generally I tend to go for more flashy, bright, non-typical (not work appropriate) colors with awesome finishes. For some reason, I just wanted to wear a simple light pink creme and French Affair was that.

**Please note that even if my photos look a little wonky, the polish looks perfect in real life**


3 coats French Affair
1 coat Poshe
*Another side note:
My pinkie had been out of commission due to a horrible, horrible break a few weeks back. It finally grew out enough for me to silk wrap, and is back in my photos!! Woo!! And if you paid attention the the green blob on my palm, that's the reflection of the 50% off sticker I didn't take off the bottle.

Good GOSH this application was terrible. I don't understand how Essie manages to repeatedly put out pastel cremes like this. It was streaky, too thick, dried quickly on the brush, and had awful cuticle drag. This polish is a mess, I am so disappointed. The photos you see are actually a re-paint because the first one I stared at closely and realized would look horrendous in Macro photos. I lost a lot of patience dealing with this polish. This is one that you need to be prepared for. Because Nice is Nice was from the same collection and the formula was fine there, I was really hoping it would be great here, too. Nope. It followed in the footsteps of Mint Candy Apple (which I was prepared to deal with having worn it plenty of times, so it wasn't that bad) and joins with the application of Topless & Barefoot, also from the same collection.
Please don't get me wrong. Don't let the application deter you from this polish. Just be aware that it requires some babying and it won't be a quick out-the-door polish.

The color on the other hand, is gorgeous, and is why you really shouldn't be so weary of the formula. It's a cool-toned pastel pink that gets totally opaque, looks beautifully creamy, and has a brightness to it that doesn't make your hands look dead. It's a creme that keeps me staring at my nails. I've found some lighter pinks can look messy and childish. This is not one of them. It's so gorgeous. I love the contrast of the cool-toned polish with my warm/olive/yellow skintone. I think it's so lovely and as of now, will be my go-to baby pink. I would also say that it is in the realm of being one of those perfect Barbie pinks, just the light version as opposed to the bright, fun version that is Orly Fancy Fuchsia.

Bonus!!
My amazing little pup dog, Paisley, chillin' in the sunshine!! Caught this photo mid-sniff lol. She was lying out while I was taking photos this morning. Her nickname is Small Dog.

Thursday, June 23, 2011

Summery, Sparkly Finger Paints

My Finger Paints collection isn't particularly huge because whenever I try them, I tend to be disappointed by their formula. That, and their colors don't tend to stand out to me. I own some pretty old ones, but prior to this one, the last FP I bought was Chrysanthe-Mum's The Word... which was horrendous.

So anyway, I had a coupon for a free Finger Paints if I renewed my Sally's card this month. Ironically, I had been at the casino recently checking out some Butter London's and I kept staring at Henley Regatta. I came super close to buying it, but figured I'd wait. I had been looking into Butter London for a while, but if I'm spending $14 for polish, it has to be super awesome and not dupe-able. Lucky I didn't purchase it, because I then came across this post from The Poslishaholic that compares Henley Regatta to Finger Paints All You Need Is Color. Not exact dupes, but close enough for me!! So I picked this up 2 days ago when I renewed my card.

I had been trying to think of a base to use because the thought of glitter removal 9 times out of 10 (ok, more like 99 times out of 100) deters me from even bothering. I figured a base would help with the removal, and I wouldn't have to use like 3 layers to get the glitter opaque. This was actually the reason for me choosing my mani yesterday.

So here's what it looks like today.


Close-Up


2 coats Orly Bailamos
1 coat Poshe
1 coat All You Need Is Color
1 coat Poshe
*See the bottom of this post if you're wondering why you're not seeing my pinkie in my left hand photos.

This polish is packed full of blue and green glitter in a thick, clear jelly base, and the base is a good thing because it allows the glitter to be packed together instead of sparse. Judging by some swatches I did on a nail wheel, it looks like without a base coat, you'd need 3 coats of AYNIC for it to be opaque on the nail. I'm pretty happy with using Bailamos as a base because it color matches super well and even though you may see it peeking through in my photos, you'd have to stare very closely at my nails to see those gaps in real life.

I elected to do just 2 accents nails on each hand more so for removal purposes. Even with the foil/felt method, I'm still dreading it. 4 nails seems much easier than 10 9. Stupid pinkie... still wrapped in a Band-Aid because I have no idea what to do about it still. Maybe I'll silk wrap it Sunday.

Wednesday, June 22, 2011

Bad Day for Orly Bailamos

Lately I've been painting my nails at night for the next day. I never have problems with sheet marks or anything like that, and it leaves me time in the morning to get ready doing other things besides my nails. So last night I decided I was going to wear Orly Bailamos. This is one of my favorite Orly polishes!! It was in their summer Viva! collection. My sister chose this for me for my birthday last year, and I actually ended up getting a back up bottle when a girlfriend of mine who works at CVS saw it on clearance there for like 99 cents.

As I said, I did my nails last night. Well today is ucky and grey and is supposedly going to rain in the afternoon and evening. This meant AWFUL lighting for photos of this polish I'm so disappointed. This could be solved if I had a light box, but as of now, I'm not interested in making one. But the photos aren't THAT bad, their just not as bright as they could be and aren't showing the full potential of the polish. The benefit of them, however, is you can see a very realistic version of this polish, instead of it being in the most ideal setting on a gorgeous summer day.

Orly Bailamos Swatch

Orly Bailamos Swatch

Orly Bailamos Swatch

Orly Bailamos Swatch

2 coats Bailamos
1 coat Poshe

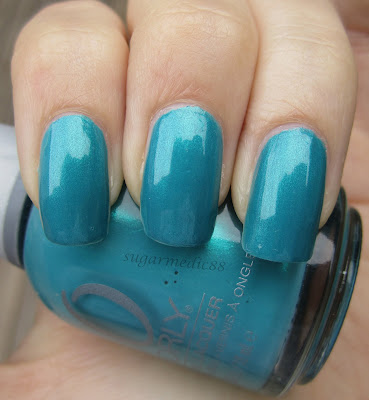
The color is amazing. Gorgeous, summery, ocean-y, just amazing. It is incredibly dimensional with a duochrome feel, but it's definitely not a duochrome. I've seen most photos that show the aqua/turquoise in the polish, but mine are really showcasing the teal and cerulean side. In some indoor lighting, I've noticed it even looks arguably green-ish. It has a cohesive shimmer that blends well with the base colors, and I think it's the shimmer that gives this polish so many interpretations. Think deep Caribbean ocean.

Great formula, opaque in 2 coats, no streaking. A very happy medium between thin and thick. I find Orly's cremes to be on the thicker side, but this is thinner than that. A huge reason why I love Orly.

I have plans for this polish tomorrow. Not much, but I can definitely build onto it for a couple of days. Unfortunately, I only have 2 days with this polish (due to work), and it looks like rain both days. I'm so irritated with the weather here. Because of these random 1 or 2 nice days, then straight back to cloudy, rainy, chilly, it just still hasn't felt like summer :(

Monday, June 20, 2011

How To: Funky, Fun Fauxnad French

Ok, I don't really wanna call this a French, because IMO, it's not. But I really liked the alliteration I had going for the title. It sounded more fun than "Funky Fun Fauxnad Tips" which is what I really wanted to call it.

I texted a pic of this to several of my friends, and two of them came back describing this mani in these words:

"They look like go go nails!" and another friend said I should do nails for weddings, and I said something along the lines of who the heck would want these nails for their wedding and she said "U could do all gypsy weddings!!!!!!!!"

I knew I wanted to do something with my Tree Hugger mani, but I wasn't sure what. It's like the perfect base color for something really awesome. Dotting, striping, Konading, decaling, 3D art-ing, SOMETHING!! I needed to do something to it. I almost went with dotting, but I couldn't quite pinpoint what I wanted to do. Then I had an idea for a BM plate, but wasn't sure if that's really what I wanted. So I asked my boyfriend what he thought, and he chose the BM design. This is the final result...


What You'll Need:
♥ A bright, fun polish as a base (I used 2 coats China Glaze Tree Hugger)
♥ Your favorite fast dry top coat (I used Poshe)
♥ A white polish for the base for the fauxnad (I used Sally Hansen Xtreme Wear White On)
♥ A black polish for the fauxnad stamping (I used Sinful Black on Black)
♥ Bundle Monster plate BM21
♥ Stamper and Scraper
♥ Tape

How To Do It:
1. Started with my base of Tree Hugger. You can use whatever color you'd like.


2. Tape off a diagonal section leaving the tip of the nail exposed. Make sure the tape isn't raised in little areas at the line you'll be painting on.
*A tip from Chloe's Nails that I highly suggest is stick the tape to your hand first to get rid of some of the super stickiness. That way it won't peel up your base.


3. Paint over the exposed tip with White On. I used just one coat if you were curious.


4. Remove the tape slowly and while the polish is still wet! You don't have to paint and rip the tape off immediately, just don't let the white dry or you risk pulling up the white. Top with 1 coat Poshe and wait until dry.


5. Re-tape the same way you did when you applied the white. It doesn't have to be PERFECTLY exact, but get as close as you can.


6. Use this design from Bundle Monster plate BM21 and paint with Black on Black.


7. Pick it up on the stamper.
*I know it missed a small portion, but this does not matter. It's not going to affect the way it stamps.


8. Stamp into the white HORIZONTALLY, the way I showed the stamper above. Don't stamp vertically like you would if you were doing it over the entire nail. You need more width than length, so it makes more sense to do it this way.


* You can see that the part that didn't pick up on the stamper doesn't even come near the white. It's all the way on the bottom right part of the tape.

9. Remove the tape and voila! Top with another coat of Poshe.

Sunday, June 19, 2011

Pop's Choice: China Glaze Tree Hugger

Today is Father's Day and I wanted my Pops to choose my polish because I made my Mom choose my polish on Mother's Day. To make it easy on the Pop's so I didn't overwhelm him, I narrowed it down to 2 choices for him. Both untrieds and both by China Glaze. Dorothy Who? and Tree Hugger. Obviously he chose the latter. I was almost not going to even ask because I thought he woulda chosen Dorothy Who?. Well I was wrong!! Haha. I'm glad, though, because I have this crazy urge to wear blue polishes every day until I've worn or reworn all the blues I own... and then buy more. If I go in that direction, be prepared for lotsa blue!!

In the meantime, the apple green shimmer of Tree Hugger will have to do...

China Glaze Tree Hugger Swatch

China Glaze Tree Hugger Swatch

China Glaze Tree Hugger Swatch

China Glaze Tree Hugger Swatch

Direct Sunlight

China Glaze Tree Hugger Swatch

China Glaze Tree Hugger Swatch

Closeup of the most amazing green shimmer EVER

China Glaze Tree Hugger Swatch

And the iPhone green I mention in my description of this polish below.


2 coats Tree Hugger
1 coat Poshe

This is from China Glaze's ecollection from 2008, but it is now part of their core collection. This is the only polish I own from that collection, but I really wanna pick up most of the rest of 'em (in this order: Shower Together, Recycle, Unplugged, and Solar Power. I could definitely skip Hybrid).

Tree Hugger is an awesome green. Definitely a dark green apple kinda color with a subtle bright green shimmer. It makes me think if I lick my nails, they'll taste like a green apple candy. For some reason I want to say it has blue shimmer, but it's definitely green. I have no idea why I keep thinking it has blue shimmer.
Just in 2 coats, this polish progressed hugely. What I mean by that is with the first coat, it was still a little sheer and reminded me so much of Sally Hansen HD in Hi-Def... which I really don't like and is sheer and streaky and yuck. I got nervous about it. Then with the second coat, the polish transformed into the gorgeous finished product. I have an iPhone and started texting when I finished my nails and realized how similar Tree Hugger is to the darker green on the iPhone.

The formula was lovely. Because of the finish, it definitely had potential of being streaky. But it's not!! 2 coats was absolutely sufficient, and I did not use thick coats, either. The first coat made the polish intimidating because as I said above, I thought it was going to turn out horrible like SH HD Hi-Def. I was wrong... thank goodness!!

Another win in my book for China Glaze. Orly is my top contender for favorite brand, but I have a feeling China Glaze will surpass that. I think after one more win for China Glaze, it'll at least be tied with Orly!!

Thursday, June 16, 2011

Blue Hydrangea with Stamping

I'm loving Blue Hydrangea so much that I was not ready to take it off yet!! I had initally planned to do more stamping with this pink and probably a yellow, but I decided to quit while I was ahead. I didn't want it getting too busy. If I could wear this for another day (I can't, I work tomorrow), I'd add to it tomorrow.


My right, dominant hand


Closeup


2 coats Nubar Blue Hydrangea
1 coat Poshe
Stamping with Bundle Monster plate BM04 and China Glaze Heli-Yum

So, the biggest problem I ran into was the fact that Heli-Yum is almost the exact same color as my Konad stamper. This meant is SUCKED trying to see the stamp to get it in the right place. My index finger isn't completely opaque because of this. I couldn't actually see that the dots in the design didn't pick up well. On my right hand, I switched to use my Essence stamper, which is a lighter shade of pink. I had forgotten just how crappy that stamper was. It's not soft enough to be able to smoosh onto your nail, and it somehow manages to get the images uneven. I only used it like two or three times on my right hand (DEFINITELY used it on my middle finger. It looks a mess).

Ultimately, my right hand pinkie came out best and how I initally wanted the image to stamp. I was using the Konad stamper for that. My left hand managed to cut off the last little branch thing on the design, which was not my intention, but at least they're all like that on that hand so it looks uniform. Haha!!

Oh yeah, and how ridiculous are all of my Bandaids? The one on my left hand pinkie and you can see the one on my knuckle of my right hand index finger. I swear I'm the clumsiest person. The knuckle thing was a result of trying to let a puppy I was dog sitting for out of her crate. It peeled up a nice chunk of skin. I was going to leave it exposed, but I went to Six Flags New England yesterday and decided that was a horrible idea.

Ok, going really off topic now, so skip if you don't care.
Six Flags. I have a fear of heights. This stupid fear originated maybe 6 years ago? I was never afraid of heights before that. Now, I've always loved roller coasters. A couple of summers ago, I started to get a little nervous about them. I then decided this heights problem is a HUGE problem and I've gotta fix it. So I tend to close my eyes when we go up the first incline, and depending on how nervous I am, I may leave my eyes shut the whole time. So here's how my trip went:
Superman (which is now called Bizzaro, but I'm still calling it Superman) - Has a huge incline at the start. Biggest incline of all of the roller coasters I went on. Eyes stayed shut. The drop made my mouth open and like stay open, I felt like I had jowls. After that, I kept my eyes shut for the majority of the coaster, but did open now and again.

Mind Eraser - Stupidest ride ever. I'm really short, so my head was right between the shoulder guard thing. My head flung back and forth between those pads the ENTIRE ride. Not the least bit enjoyable. I opened my eyes a few times, but just for the sheer fact that my head was a ping pong ball, I decided to keep them closed.

Batman - Love it!! Closed my eyes at first, but kept 'em open the rest of the ride!! I loved this roller coaster.

Skyway - Not a roller coaster. Not even a thrill ride. You sit in a caged ball and it glides you over the park. I decided it seemed relaxing. That was a horrible idea. I started out ok, but then we just got higher and higher. I ended up with my eyes shut and squeezing my boyfriend's hand so hard I thought he was going to strangle me.

Cyclone - Definitely redeemed myself on this one. Eyes open the WHOLE time. On the incline, I just stared inside the cart, but at least they stayed open!! Awesome thing about this coaster is it's super old and wooden. I have no idea why I have less fear on a rickity, wooden roller coaster, but get nervous on new, steel roller coasters.