Pages

Friday, April 29, 2011

Simple&Sheer Essie Mademoiselle (edit) and A "Royal" Wedding

Today I am attending a Royal Wedding... ish. A close girlfriend of mine was one of three couples chosen by TLC to get married in Times Square at the same time the royal wedding is taking place!! I am so excited for her and her fiance.

We have to be in Times Square at 0400, which is disgustingly early. Haha! We were instructed (by the producers) to dress as if we were actually attending the royal wedding. I may end up posting a photo of my whole outfit, but we will see! I wanted to keep with a low key, classic nail. I didn't want to do french, I didn't want to wear mannequin hands, and I didn't want something very flashy or striking. If I had nubbins, I might be more apt to do that, but I don't. So subtle it is!!

Essie Mademoiselle Swatch

Essie Mademoiselle Swatch

Essie Mademoiselle Swatch

Essie Mademoiselle Swatch

3 coats Essie Mademoiselle
1 coat Poshe

Sorry for the not so dynamic photos. I know it's not super exciting. As a huge chunk of Essie's collection, Mademoiselle is a sheer color and great for frenches if you don't like the look of just sheer. As you can see by 3 coats (and not 3 thin coats mind you), that this is not really a buildable sheer. This is one of the first polishes my wonderful boyfriend ever bought for me, and since he cannot be at the wedding (due to his schedule), I thought it was perfectly appropriate to wear this.
I love this color for something simple such as this. It gives just enough that shows there's something on your nail without being a defined color. It's a very polished *snickers* look. And because of the sheerness, it goes on with no problems, no streaking, and the brush should work fine for anyones nails. The only complaint I could imagine someone having with this polish is the fact that it's sheer and maybe they expected it to be more opaque. But that's not the intention of this polish, and therefore, I think it's lovely!!

Haha!! And I just realized what a complete 180 this is from my previous NOTD yesterday, which was my bright pink/orange/yellow water marble!

Edit -
I was going to do a new post, but because this is a nail blog, I figured it'd be boring to read a post that would otherwise be totally unrelated.
So I just got home from NYC a few hours ago (the train ride was only an hour!!) and I am completely exhausted. I got 2 1/2 hours of sleep before I had to be up and getting ready for the wedding, and some of the girls I was with didn't even bother to sleep!! It was a long day that started with watching the entire Royal Wedding before seeing our gorgeous friend, Lindsay, get married.
I mentioned I might post my dress, and while it's nothing exciting, at least you all will get to see!! I know I love seeing who is behind their blogs and a random photo of the blogger every now and again makes me feel more apart of the blog. So, here's my outfit (these are all iPhone pictures, BTW):


I don't know how "royal" it is, but I was at a complete loss about what to wear. If you're curious, the dress is from H&M and the headband/flower/fascinator is from Ulta.

Here's me and the GORGEOUS bride:


And here's a photo of the couple I took:


And a photo from the Associated Press:


I hope you enjoyed my photos!!

Wednesday, April 27, 2011

Fun, Bright Summer/Spring Water Marble

I have to start by saying this water marble will make your hands look AMAZINGLY tan.

This was the water marble I intended on doing a tutorial with. However, I only got partially done with it using this water marble. I'll have to finish it another time soon. Anyway, this probably wouldn't have been the best because I did this around 1700 in the evening and the lighting wasn't fantastic, and I had initially started outside, but then all of a sudden the wind picked up and I had to move inside. So I took about half of the photos I wanted to take. Even worse, I was dipping my clean up brush into my bottle of remover and it FELL IN. What a gosh darn mess. So I didn't use it after that because the paint on the handle of the brush was smearing all over thanks to the acetone. So be forewarned that my right hand doesn't have as nice of clean up. I'll discuss another issue with the water marble at the end of the post.

Bright Summer Water Marble

Bright Summer Water Marble

Bright Summer Water Marble

Bright Summer Water Marble

Base:
1 coat Sally Hansen Xtreme Wear in White On
For the water marble:
China Glaze Peachy Keen
China Glaze Lemon Fizz
Orly Basket Case

So here are the two things that I was annoyed at by the end of the water marble.
1. My initial pattern (as seen on my ring finger on my left hand, which are the first photos), ended up altered from the rest. Looking back at photos I took during the process, I realized why I wasn't getting the same pattern on the rest of my nails... because I wasn't doing the initial pattern in the water. Ugh. So I only realized that after I uploaded the photos and my nails were done. Sucks because I REALLY liked how that first nail came out.
2. I had horrible, horrible bubbles with this marble. Because my technique was no different than usual, I can only assume it had something to do with one or more of the polishes I used. If you hadn't noticed, go back and look at the photos and you'll see random little white dots. Those were bubbles that were popped with the top coat was put on. I definitely get bubbles sometimes, but NEVER this bad. I'm kinda confused. But in the future, I think instead of a white base, I might do the lightest color I'll be using in my water marble. Hopefully that will camouflage the bubbles if it happens this badly again.

I might just redo this entire water marble later on. It's more summery anyway, so it'll be perfect in a couple of months.

Monday, April 25, 2011

Spring Green/Blue "Konad"

So for Easter yesterday, I kept it boring and just wore OPI What's With The Cattitude? I was going to do some Easter nail art, but I was spending the morning cooking and baking and just didn't have time.

Today, I decided to keep with WWTC, but change it a little. OPI Gargantuan Green Grape is obnoxiously sheer and a pain to apply on it's own. So I decided to put it over WWTC from yesterday. I was left with a very pretty green color. I then decided to go a step further and do some fauxnad. Here's the end result:

OPI What's With The Cattitude?<br /> Gargantuan Green Grape Bundle Monster Swatch
This photo is most true to life. I wanted you to be able to see the WWTC and GGG. You can't see the fauxnad well, but that wasn't my intention with this photo.

OPI What's With The Cattitude?<br /> Gargantuan Green Grape Bundle Monster Swatch

OPI What's With The Cattitude?<br /> Gargantuan Green Grape Bundle Monster Swatch

OPI What's With The Cattitude?<br /> Gargantuan Green Grape Bundle Monster Swatch

OPI What's With The Cattitude?<br /> Gargantuan Green Grape Bundle Monster Swatch

OPI What's With The Cattitude?<br /> Gargantuan Green Grape Bundle Monster Swatch

OPI What's With The Cattitude?<br /> Gargantuan Green Grape Bundle Monster Swatch

OPI What's With The Cattitude?<br /> Gargantuan Green Grape Bundle Monster Swatch

3 coats OPI What's With The Cattitude?
1 coat Poshe
1 coat OPI Gargantuan Green Grape
1 coat Poshe
Bundle Monster plate BM16 with China Glaze For Audrey

I'm kind of disappointed because I imagined For Audrey coming out darker, but it's just very subtle over the base. I didn't feel like redoing it, though. The photos came out horrible and I didn't realize how red my hands looked until after I uploaded. It's not THAT bad, but just know that at no point during the day did my hands look like lobster hands.

I was just going to skip posting this, but I figured since I had already done photos and haven't posted nail photos since my spring water marble nearly a week ago (THAT LONG!?), I figured why not?

Song:
Buffalo Springfield - For What It's Worth

Wednesday, April 20, 2011

Water Marbling Hints and Tips

Hints and Tips for water marbling that will hopefully help you out!! Within the next couple of days I will be posting a full tutorial on how to do water marbling.
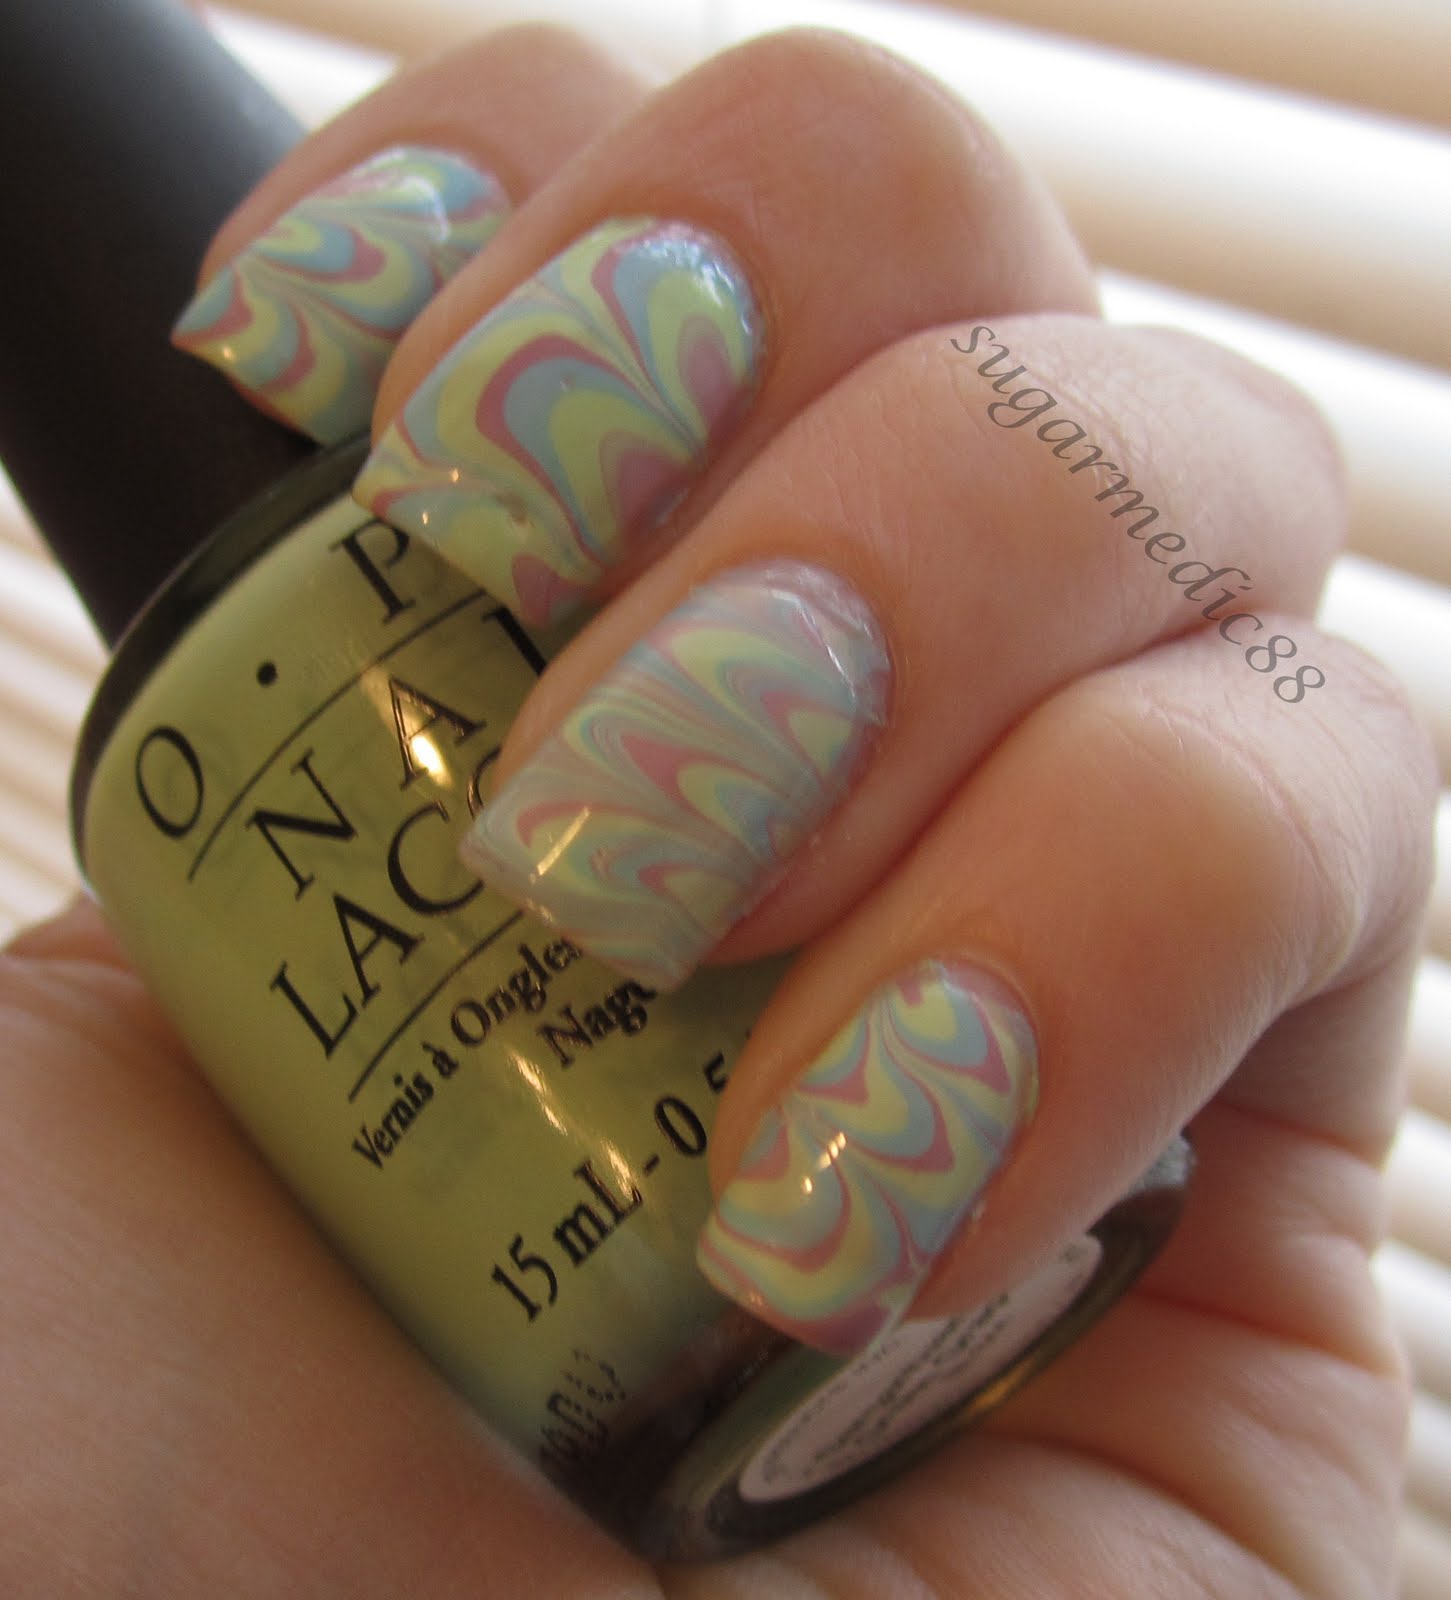

*Design from this water marble*

Be prepared!! Make sure everything is near you.
Pre-peel tape, have a napkin available to wipe off your toothpick/orange stick, have several toothpicks/orange sticks available, have nail polish remover and Q-tips ready to go, have your base coat ready in case you mess up and need to try again, have a garbage or somewhere to put your used tape.

If you're just starting out, do not use expensive, discontinued, or rare polishes.
I mean, you can, but you may find yourself wasting WAY too much for learning. If it's a polish you don't care about, go for it.

I highly suggest taping off your finger.
Prep the finger you plan to dip prior to dropping polish in the water. If you're experienced with water marbling and know you'll be able to dip two fingers at once, tape off both before you begin. If you're newer at it, start by taping one. If you end up with a design that you are able to dip two fingers in, just let the design sit and tape off your other finger.
Also, if you have your thumb taped off but the design you have in your cup looks like it'll work much better on your pinkie, take the time to tape off your pinkie. The design isn't going anywhere, you have plenty of time.

Make sure you tape off AROUND your cuticle, not onto your nail.
You could end up with a funny shape near your cuticle if part of your nail doesn't have the water marble. It's much easier to clean polish off your cuticle/finger than to redo the entire nail because it looks weird.

Use a cup, not a bowl.
You want the outer most layer of polish to touch the sides of the cup. This helps anchor the polish so when you drag through to make the design, it doesn't spread around.

If the design is not going the direction you like after multiple attempts to save it, you might just have to give up.
It sucks to waste the polish, but ultimately, with the time it takes to water marble, you want the most gorgeous designs on your nails. Don't settle!

Don't start your design at the outer most ring.
The outer most ring tends to dry first. This is a problem because when you go to make your design, if you start dragging from outer layer, it can stick to your toothpick and it can ruin the rings. Make enough rings so when you go to drag through them for your design, you don't start at the outer one. You want to start at least one or two rings in. Think of the outer layer as the anchor.

Warm water is not better.
There's a reason behind using room temperature water. Filtered is preferred. Here's what happens if you use a variation of that:
Unfiltered - depending on where you live, your tap water probably has different minerals. This can cause the polish to not spread as well.
Cold - If you have a Brita filer or something where you keep your filtered water in the fridge, you might be tempted to not wait until it's at room temperature. Cold water can cause the polish to dry quicker, making your design pull and mess up when you try to drag through it. It can also cause your polish to not spread nearly as well as it should.
Warm - So if cold water causes polish to not spread well and the design to stick to your toothpick or orange stick, then warm water must NOT do that, right? Correct. However, warm water has a different issue. It works great for spreading polish, but a couple of problems arise from this. First, if you do not have enough layers of polish in your cup, because warm water is so good at spreading polish, when you make your design, it can cause the polish to "leak" and spread more. The second issue is clean up. Because warm water prevents polish from drying quickly, after you dip your nail and try to clean up the polish before pulling your finger out, the polish will be very difficult to get up and will not stick easily to your toothpick/orange stick because the polish isn't drying.

If you have short nails and/or you're new to water marbling, don't do a lot of colors.
You may see people on YouTube doing tutorials with 5, 6, 7 colors. They're experienced and most have long nails. If you're not an expert, so many colors leaves a greater difficulty for creating a pattern because you want all of the colors to be seen.

Seriously make sure your water surface is clear of polish.
It might be difficult to tell, even with dark colors, that there is enough polish on the surface of the water to not allow polish to spread. I clean up the polish while my nail is in the water, but I also make sure I go over it again before I'm about to drop polish into it. I can't tell you how many times I legit end up pulling out large pieces of polish I hadn't seen.

Be aware of large drops of polish.
You're going to find that some polishes will always drop right off the brush, some will always be difficult, and others are super sneaky and do either/or every time you drop them. Let me explain. When you're doing so many drops of color throughout the entire process, you become complacent and sometimes don't even look at the polish bottle. You just grab the brush and hold it over the water. Many times, a brush decides that it's going to get a HUGE amount of polish on it, so when you pull it out, it surprises you and drips everywhere! Worst of all is when you're on your last set of drops and it smears all over your polish in your cup, potentially ruining it and causing you to start over. Keep an eye on your polish when you take it out of the bottle. It might surprise ya! And not in a good way...

Make sure your workspace is disposable or you're ok with it getting ruined.
Because there is always risk of polish dripping everywhere, bottles tipping over, even the cup spilling, make sure you're doing this on a towel, paper towel, or surface you're ok with potentially getting polish on.

Be conscious of your other nails when you're dipping.
I swear I've done this EVERY time I've water marbled. Sometimes I correct it, other time you'll never see the mistakes in real life, but my macro photos make it look HUGE. Let me give you some examples of what I've done. I'll save the best for last.
I catch a marbled nail on a toothpick or side of the cup and I make a dig in it. Even worse, when I go to dip a nail, I push a marbled nail against another finger and make a HUGE smudge that cannot be saved. My favorite thing I did? I did this only once and it was actually when I was doing my Spring/Easter v1.0. I went to dip my ring finger nail, and just as I went to start cleaning up the polish on the surface, I also dipped my already marbled middle finger into the water/polish. Yup. That was fantastic. And it looked awful. Luckily, I had already top coated it, so I gently went over it with a Q-tip and remover and was able to get up the wet mistake dip and leave my previous marble design. Phew! It looked a little sheer, like you could see my white base a little, but it still looked totally acceptable.

Paint your ENTIRE nail with your base color.
When I paint my nails regularly, I ALWAYS leave a gap between my cuticle and the start of the polish. When it comes to marbling, forget that. Go all the way to your cuticle. I recommend doing this because if you don't, you'll get a sheer patch of marbled polish by your cuticle. And it's much easier to clean up after than have to redo the nail because it looks odd.

Not all polish works.
This is a trial and error process. Just like quality varies from polish to polish, good water marbling polishes vary as well. Generally, the thicker the polish, the worse it'll be in the water. So if it's a gummy kinda polish, it probably won't spread well. However, you can get sheer colors that sink right to the bottom and don't even spread at all. You just have to experiment. But be aware that just because you tried 5 different polishes from the brand and they didn't spread well, it does NOT mean all polishes from that brand are like that. Judge based on the specific polish, not the brand. I will warn you, however, that every single matte polish I have tried has NOT worked. Let me know if you find one that does, but I've tried mattes from Zoya, Ulta, OPI, and Nicole by OPI all with no success. They might spread the first or second ring, but after that you're just adding blobs to the water.

Do NOT blow on your nails, do NOT shake them.
You may be tempted to do this when your nails come out of the water. Please don't! This can cause bubbles or even mess up your design. Just let it air dry.

Take your time and be patient.
You can do it :) It just takes practice!!

Tuesday, April 19, 2011

Spring/Easter Water Marble v1.0

This is one of two spring water marbles I have planned. This is my favorite water marble to date!! I'm certainly not an expert, but I do have some tips that'll hopefully help those of you who want to learn water marbling. I started typing them into this post and realized it became WAY too long, so tentatively, I plan to do a water marbling tips post, and another post on how I actually do water marbling. Or I may combine them, we'll see.

Anyway, enough rambling, onto the water marble!!

Pre Clean-Up:


Post Clean-Up:

Pastel Spring Water Marble

Pastel Spring Water Marble

Pastel Spring Water Marble

Pastel Spring Water Marble

Pastel Spring Water Marble

And I'm throwing this one in, too. It's from my cell phone:


Base:
1 coat Sally Hansen Xtreme Wear in White On
For the water marble:
ELF Lilac
OPI What's With The Cattitude?
OPI Gargantuan Green Grape

You may be wondering why most photos are of my left hand. Well, it's because I'm right handed, and trying to hold my camera and take photos with my left hand is NOT a pretty thing. My hand shakes when I try to push the shutter button, and my right hand doesn't know how to pose properly. It's just an ugly combination and I rarely get a nice photo, which is why you guys always seen my left hand.

Also want to note that this water marble was totally inspired by this post from the AMAZING My Simple Little Pleasures. She has phenomenal water marbling skills. I ♥ her!! And I had initially picked different colors, I hadn't intended to use the same colors she did. I had Green, Blue, Orange, and Pink. But the orange was WAY too dominating, and I decided to switch out the pink with purple because I have another marble I want to use pink in. My inspiration from her post was the pattern... which actually looks nothing like what I ended up with! Haha, oh well!!

Sunday, April 17, 2011

China Glaze TMI

Sunny days around here have been essentially nonexistant. That whole "April showers bring May flowers" is very much in effect. BUT... today it's WARM!! Not only is it warm, but it's SUNNY!! Yay!! So what better to wear on one of the first true sunny days than a holo? I thought about wearing a Tronica, but I'm waiting for a super sunny day that I'll be at the beach or something, because they require a lot of sunlight to really see the holo. So I chose to wear China Glaze's TMI!!

Be forewarned I went a little crazy with uploading photos. I liked so many different ones!! I figure that's ok, though. I always like looking at more than one photo because polishes always look different in different lighting and positions. I hope you don't mind!!

China Glaze TMI Swatch

China Glaze TMI Swatch

China Glaze TMI Swatch

China Glaze TMI Swatch

China Glaze TMI Swatch

China Glaze TMI Swatch

China Glaze TMI Swatch

China Glaze TMI Swatch

China Glaze TMI Swatch

China Glaze TMI Swatch China Glaze TMI Swatch

1 base coat Essie Matte About You
2 coats TMI
1 coat Poshe

Song:
Hootie & The Blowfish - Let Her Cry

Wednesday, April 13, 2011

All Rose Lead to Rome Matte with Konad

I loved wearing ARLTR on it's own, but I had envisioned this concept when I knew I would be wearing ARLTR for two days. I had intended to use a different Konad design (it was actually an Essence plate), but unfortunately after 3 attempts to pick up the image, there was the same corner missing on a flower. I wanted the border look, so I had a Konad plate stored with the Essence plate, and just went ahead with this new design. Here it is:

OPI All Rose Lead to Rome Swatch Konad

OPI All Rose Lead to Rome Swatch Konad

OPI All Rose Lead to Rome Swatch Konad

OPI All Rose Lead to Rome Swatch Konad

OPI All Rose Lead to Rome Swatch Konad

OPI All Rose Lead to Rome Swatch Konad

And a close up of the design
OPI All Rose Lead to Rome Swatch Konad

2 coats All Rose Lead to Rome
1 coat Poshe (from the previous day)
2 coats Essie Matte About You
Konad Plate m36 with white Konad polish

Tuesday, April 12, 2011

OPI All Rose Lead to Rome

See it Matte!!

This is the oldest OPI I own!! And definitely my favorite OPI I own.
We have... All Rose Lead to Rome...

OPI All Rose Lead to Rome Swatch

OPI All Rose Lead to Rome Swatch

OPI All Rose Lead to Rome Swatch

OPI All Rose Lead to Rome Swatch

OPI All Rose Lead to Rome Swatch

OPI All Rose Lead to Rome Swatch

And a close up of the polish
OPI All Rose Lead to Rome Swatch

2 coats ARLTR
1 coat Poshe

I wish they were still made like this. I love the formula and brush so much more! As I've said before, and will continue to say, I don't like the ProWide brushes. WAY too wide for my nails, and because I don't do clean up, I prefer smaller brushes because they allow me to better shape the polish on my nail.

Anyway, this is the older sister of Pompeii Purple. More red, and not as much of the duochrome-ness as PP, though. But it still holds onto that hot pink aspect. I'll call it a shimmer, but it's a VERY fine shimmer. Definitely not a creme or pearl, though. Mildly Iridiscent.

It's a dream to put on. Seriously. I'd say it's probably one of my favorite formulas. I can't think of anything better. It doesn't drag, it just glides, it's impossible for it to look uneven (like literally impossible), the consistancy is perfect, the brush doesn't start to dry out as you're putting it on. It's perfect.