Pages

Showing posts with label White. Show all posts

Tuesday, August 16, 2011

Gettin' Loaded Again

Since purchasing Load at Sephora in NYC back in April, it has been ALL of my friend's favorite polish. It's the one that gets brought up everytime my obsession with my nails is discussed, it's the first polish they think of, and it's the first polish that's mentioned when they explain my hobby to someone else. I think this happens for obvious reasons. It's an off white creme called Load. I mean c'mon. I love my friends :)

So today I asked a friend what color polish I should wear. Instead of a color, she just straight up says Load. Well, I haven't worn it in months and the darn thing did cost me $14 and a trip to NYC (granted that's not why I went), but still.

I wanted to do something besides wear it on its own because I had already posted about it. This is what I came up with.

Illamasqua Load with Bundle Monster

Illamasqua Load with Bundle Monster

Illamasqua Load with Bundle Monster

Illamasqua Load with Bundle Monster


2 coats Illamasqua Load
1 coat Poshe
Stamping with Bundle Monster plate BM01
Purple stamp is China Glaze VIII
Blue stamp is China Glaze Up All Night
1 coat Poshe

I sat around for a while with just Load on my nails (I am not mature enough to handle writing this). I figured I'd end up stamping over it, but I knew I didn't want a really heavy full nail stamp over it because I didn't want to hide Load. Then I was doing something and all of a sudden realized navy and dark purple would look gorgeous over it. So I flipped through my plates to find something that I could use for both.

I'm loving the color combination, don't know how much I love the stamp I chose. It's definitely not bad, but I wish it was less defined meaning it was more... swirly I guess? instead of it looking so much like a fern. I think it's cool and vintage-y, though. It reminds me of old china or something. Maybe not china, but old opaque glass like a lamp or something decorative.

I've already talked about Load's formula, but I want to redo my opinion of the formula and application. The first time I wore it, it was AWFUL to apply. It had cuticle drag, it wasn't very manageable, you get the idea. Well today, I was prepared for it... and it was a THOUSAND times better.

Tips For Applying Illamasqua Load
This polish requires babying, and so long as you're aware of that and prepared for it, it'll be a piece of cake. This is definitely not a slap-on-and-go polish. So here is what you can do to help.
You need to paint one nail at a time. Duh. But what I mean is you need to paint one nail, and put the brush back in the bottle. Let it relax in the bottle for a few seconds. The polish dries very quickly on the brush and it makes it too thick when you apply it. So it needs to rest before you go to the next nail.
Paint quickly. Do not spend a ton of time fixing the nail. As soon as it starts getting too thick or sticky, put it brush back in the bottle and let it rest. Letting it rest is the BIGGEST help.
Use very few strokes. This just sorta goes along with the paint quickly. You should always use as few strokes as possible, but you HAVE to with this polish. And again, if it gets unmanageable, get the brush back in the bottle and let it rest.
Use a very light touch. Balance your wrist on something so you're not digging the brush into your nail. You need to glide it gently over the nail. This is very important or you will get cuticle drag and streakiness like whoa.

This seems like common sense, but obviously it wasn't for me the first time I used this polish. I was apparently in a rush or something. So follow those steps, and it should help a ton!!

Monday, July 25, 2011

Zebra With Some Accents

Another day of no idea what to do. I texted my friend this morning whining about how I had NO idea what to do with my nails today. She suggested houndstooth, so I had a go with my old BM plates, which are typically fine in width... however my nails are far too long to do that right now. I needed to try something else. I already had my nails painted white, so this is what I came up with...


Started with:
2 coats Sally Hansen Xtreme Wear in White On
1 coat Poshe

Pinkie, Middle, Index:
Bundle Monster plate BM-223 (zebra) stamped with Sinful Black on Black
1 coat Poshe

Thumb:
Bundle Monster plate BM-223 (zebra) stamped with Orly Royal Navy
Bundle Monster plate BM15 (feather) stamped with Sinful Black on Black
1 coat Poshe

Ring:
1 coat Orly Royal Navy
3 coats China Glaze Dorothy Who?
1 coat Poshe

Oh yeah. How amazingly tacky is this?? I'm all about it, obviously. I messed around with so many different ways of doing this because I had only an iffy vision of what I wanted. Plain zebra stripes was not an option. I debated about doing something red over the zebra (maybe a red rose or something like that), but then I saw Dorothy Who? and decided I had to go with blue. I chose Royal Navy as the zebra on my thumb simply because the feather didn't work over black, even when stamped with a dark, opaque blue (not Royal Navy). The feather, by the way, has zero significance. I just wanted something that wasn't too complicated, and was dense enough to go over the zebra stripes so you would still be able to figure out what it was.

Speaking of the friend I was texting, she doesn't get to see it until tomorrow. Unless she can find my blog. I think only one of my friends has seen my blog. And in case he comes across it again...
HI JIM!!!!!!!!!

Saturday, July 2, 2011

Newport Nails

I'm pretty behind on posting because I recently spent a night in Newport, RI and wasn't around my computer until late, and then had a crazy busy day the next day, then I've been at work. That's ok, though, because I did my Summer Neon Crackle again. I spent the night out in Newport with my boyfriend, and when I went there, I had these nails. I only live less than an hour away from Newport, but it made for a nice mini getaway.

Again, this mani has been posted before, but because I loved it so much, I had to wear it again!!


1 coat of an unknown neon pink Orly (it might be Passion Fruit? Or at least similar to it?)
1 coat China Glaze Lightning Bolt

Be prepared for ramblings about my trip to Newport, RI. If you're not interested, skip this part!!
We had dinner at The Red Parrot last night, which we had previously tried to go to a couple of years ago. We had been with some friends, all of us over 21, and I don't remember the details, I think we were trying to get into the bar. Point being, one of our friends had a reissue RI license because he had lost his. They wouldn't accept it, so they wouldn't let him in. I don't quite understand why they couldn't. Wouldn't a reissue still mean it's a real license? So he can't get in there until his license expires and he needs to renew it? I don't know. Anyway, The Red Parrot. The food was fine, good selection for vegetarians (my boyfriend is far from a vegetarian haha). We had some spring rolls as an appetizer and my boyfriend LOVED the red pepper dipping sauce they had with it, and he asked what exactly was in it. The waitress told us she wasn't quite sure because they don't make it there. It was kind of annoying to learn they just buy the sauce as-is. It's not like they're a chain restaurant, ya know? So what else is just store bought and then served to us? Then I treated us to some awesome Awful Awfuls from the Newport Creamery. Delicious!!

The next morning it took my boyfriend FOR-FREAKIN'-EVER to get up, but it didn't really matter. We wondered back to where we were yesterday and figured we'd walk through the shops and just spend the day there. The shops in Newport, RI are ridiculously redundant. Let me give you a tour... Jewelry Store next to a Clothing Shop next to a Tourist Shop next to a Gallery/Antique Shop next to a Jewelry Store next to Clothing Shop next to an Ice Cream Shop next to a Tourist Shop next to a Gallery/Antique Shop next to a Jewelry Store... you get the idea. They have a few random places that don't fit that description, but they're not wowing by any shot. For example, they have an Army Navy store. It's full of like mass production camo stuff and some tourist things. Other Army Navy stores I have been in have more realistic type of things. So basically, if you're thinking about going to the shops in Newport, I suggest heading southwest and going to Mystic, CT to check out Olde Mistick Village. It's a thousand times more interesting when it comes to the variety of shops.

My boyfriend convinced me to get into one of these little 3 wheel street dune buggy (apparently they're called Scoot Coupes) and drive around near the mansions and ocean. We had done this before, only we had a moped. This little car was so bizarre, but whatev, it was fun anyway. We then wanted to grab lunch, and some chick was handing out 10% off coupons to a restaurant called H2O, which we had eaten at on a previous trip to Newport. It sits partly on a dock, so you're RIGHT on the water, which was nice. But the service was horrible!! They had a whole 7 tables with people, so they were not even close to being busy. Their lunch menu is very small, but that's fine with me because the Roasted asparagus, red pepper, and hummus sandwich sounded amazing. My boyfriend got some grilled chicken sandwich. So the guy, who I didn't think was actually a server, took our order. 25 minutes after we had been there, the girl who I assumed was our server finally came up to us and asked if we were ready to order. Wow. Yeah, we already did. Let me remind you, there were SEVEN tables with people at them!! Just 7. So our food finally comes out, the poor people at the table next to us still didn't have theirs and I could tell they were annoyed and I don't blame them. My sandwich was correct, but my boyfriend got some fried fish sandwich... not what he ordered at all. So they finally brought out the correct meal, and ultimately took it off the bill without us mentioning anything about it, which I thought was very considerate though I wouldn't have minded paying for it. The awkward thing was my sandwich was server on a soft grinder roll. Like a store bought hot dog bun type of thing. The completely wrong type of bread for this type of sandwich, I just ended up eating everything off the bread with a fork. The French fries were perfect, though. My ideal fry! Haha. That poor table next to us got their food once we were finished eating, and they had even messed up one of their orders. Very awkward service. And the prices were WAY too high for the situation. My sandwich was $12!! Too expensive, in my opinion, for a lunch sandwich and poor service. But at least it was good minus the bread.

We walked around some more and stopped in a place called Cupcake Charlie's for dessert. It was a cute little cupcake shop, nothing particularly special about it except you could see the kitchen out in the open, which was nice. The cupcakes looked amazing, very appealing and well garnished. We chose to split a Chocolate Raspberry Surprise that was actually fantastic. The chocolate cake was very moist and not artificial tasting. Apparently it had a filling of chocolate raspberry ganache, but I noticed it on top of the cupcake/under the frosting, not so much actually inside the cupcake. The frosting had a very strong raspberry flavor, and that was definitely a good thing. Here's a photo of the display case courtesy of my iPhone:


The cupcake we had is the one in the case on the right on the middle shelf with the pink frosting and cute little chocolate straws.

After that, we just headed home... well, we stopped at Ulta because I still had a $5 off $10 coupon that expires today. Picked up two polishes I had been wanting... well, my boyfriend did and he's keeping them until my birthday. Haha!!

Tuesday, June 14, 2011

Summer Neon Crackle

I hate Black Shatter. I keep trying it, and keep hating it. I think a big part of it is because it's summer (spring), and when I think polish for summer/spring, I definitely don't think black. Overall, though, I'm not a huge fan of the crackle trend. I haven't been tempted to buy the new OPI crackles... the Sally Hansen crackles... the Pure Ice crackles... you get the idea. (Though I may grab some of those new metallic China Glaze crackles when they come out).

In an attempt to jump on the crackle trend, I finally found a combination I'm satisfied with.


1 coat of an unknown super old neon pink Orly
1 coat China Glaze Lightning Bolt

I've been DYING to do this for months. Literally months. I had it in my head and just knew I'd love it.

But where's my pinkie you ask?


Busy being injured. Super bad break after slamming my finger into a door (not in a door, into a door). I don't even know what to do about it.
More about it later, but if you're curious and might have some suggestions on what to do in the meantime *cough*Loodie*cough*, please let me know!! (I'm thinking silk wrap but I don't know if the glue would be a bad idea because it broke to the skin).


Keep in mind there's strengthener on my nail that started to peel up near the break, too, so it looks kinda odd. I'm afraid to remove it because I think the remover might sting.

Sunday, June 5, 2011

Spring Wedding Nails

This was from my friend's wedding yesterday!! This is actually the same friend whose wedding I went to in NYC. So the night before the wedding I water marbled one of my friend's nails and it was super fun! She was totally into it and loved doing it!! They came out awesome, I'll try to get a picture.

So I had to decide what to do for my nails. I slowly started to piece together my ideas to create a cohesive look. All of my friends know I'm a nail fanatic (I was with the bride and the wedding party last night when I water marbled our friend's nails), so I know they're expecting something awesome. My dress is not a solid color, so I didn't want to do anything too flashy. I was contemplating doing a complete water marble, but decided that was too much for me to do today, and I knew I wanted to wear Essie Mint Candy Apple. So the game plan became MCA on all nails but my ring fingers, which will be water marbled to match colors in my dress. I was going to water marble my thumbs, too, but one of my thumbs is getting a fake nail, so I decided not to bother. I'm actively doing my nails as I'm typing this, so I'm also considering possibly Konading some or all of my other fingers. If I do it, it'll be in white and something subtle, not a full nail design. So let's see what I ended up with...


Close-ups of the Water Marbles


2 coats Essie Mint Candy Apple
Water Marble:
Sally Hansen Xtreme Wear in White On
Essie Mint Candy Apple
Essie French Affair
1 coat Poshe
Konad:
Konad White with Essence stamping plate (design also on Konad plate m4)

I had been reluctant to use MCA because it tends to be difficult to work with. This time, though, it really wasn't that bad. Probably because I expected it so I was careful. It's one of those that tends to get dry on the brush so it becomes difficult to apply. I find if you frequently let it rest back in the polish, application is much better. It did have a little drag, but I was able to get around that the majority of the time. It was somewhat uneven (not streaky, just uneven), but that was resolved with a top coat.
MCA is a pretty well known color, and despite the application problems, I still think it's worth it. It's such a bright, fun turquoise that leans more blue than green. When I think "Mint", and I think green, but this is definitely more blue.

The water marble was great, but there were bubbles. Luckily only one on each nail is actually visible when you look at the nails in real life, and even then, they're so subtle. The colors spread perfectly and easily in the water, even though MCA is pretty thick. I did not expect it to spread NEARLY as well as it did, which further proves each polish is different when it comes to marbling.

I decided to go with a simple Konad design on my thumbs just to add a bit more, and so you could notice it when I text on my phone.

What was awesome, though, was my friend whose nails I marbled the night before. She was at the pasta station getting food and the servers started asking her about her nails!! She told them I did them and they asked what salon I worked at because they LOVED them... heehee. That made me feel kinda awesome lol.

Here's what I wore that was the inspiration for my nails:

Tuesday, May 31, 2011

One More With Revlon Electric - Retro

So far this is the third thing I've done to build upon my intial mani of just simply Revlon Electric. I had added a white floral bundle monster print the next day. Charlotte Sparkle had made a comment that I should've done the orange dots in the flowers (I had left them just white). Well, she was totally right. I should have:


Closeup


2-3 coats Electric
1 coat Poshe
Stamping done with Konad white polish and BM16
Dots with China Glaze Peachy Keen

There is no top coat over the design, and this is my third day with this mani, so there is a little bit of wear. Luckily, it's MUCH less obvious in real life as opposed to the close up photos. Yesterday was the last day I planned to wear this mani, and I didn't add the orange dots until afterwards. Makes me wanna wear it for another full day with the dots... and I actually think I will. I work tomorrow so if I do a new mani today, it'll have to come off by the evening. I might as well just leave this on!!

I'm really disappointed I didn't do this sooner. I'm sorry these Electric posts have been so repeditive, but hey, at least I'm honest!! Haha. And I hope that things like this help you guys who aren't ready to change your polish but are sick of looking at the same solid color. Add something to it and keep mixing it up!! You don't always have to change your polish to make your nails look different :)

I love the retro feel to this nail. Yesterday it looked lovely and vintage, but now I'm calling it awesome and retro. Just from adding simple orange dots!! I did use a dotting tool to add them, but if you don't have a dotting tool, here is a post I did that listed some other options.

And if you're curious, the Bundle Monster plate I was using I purchased from Amazon.

Monday, May 30, 2011

Lovin' Revlon Electric So Much More!!

First, a side note:
I'm sorry that I've been rarely replying to your comments on my posts!! Blogger is being ridiculous right now, and won't let me log in when I try to post comments. But as soon as I click "Sign In", it brings me to my dashboard. Then I go back to try to comment, and it tries to make me sign in again. But then it leads back to my dashboard. So I've downloaded Firefox, which allows me to post comments, but I HATE working on Firefox. If you guys know how to fix this, please let me know. I've tried logging out and back in, clearing my temp internet files and cookies, nothing is working. And it's obnoxious. But again, I totally apologize if I did not reply to your comments!! This has been going on for a couple of weeks.

Edit to the side note -
Someone on MUA figured out how to fix this problem!! Uncheck the keep me signed in thing.

Onto the post...

I decided I wanted to do something more with Electric. I invisioned white flowers with orange dots in the middle, giving a pretty daisy feel. I went through my stamping plates, found some potential flower designs and forced asked my boyfriend to pick one of those designs. This is from Bundle Monster plate BM16.


Close-Up


2-3 coats Electric
1 coat Poshe
Stamping done with Konad white polish
I decided not to do a top coat

The photos are making the color of Electric look like it has green undertones. It doesn't. It's much more creamy yellow looking. No green. I tried like a thousand times to get a really accurate color photo, but just couldn't. It's so much more gorgeous in real life.

I'm def loving this. It's so simple, so springy, so sweet. And it's amazing because when you look at my nails in real life, it gives Electric a COMPLETELY different effect. It looks pearly, but not elderly frosty. It's just so lovely. I think that's the best way to describe it. Lovely. And kinda vintage. I love vintage.

So obviously there are no orange dots. I decided to skip that because I think the simplicity of just the yellow and white would be ruined if I did that.

I know a lot of people complain about the width of the old Bundle Monster plates (this is the old set, I don't own the new set, but I'm debating about it). I know the new set made their full nail stamps larger so they'll fit on the nail better. As I talked about before, I have skinny nails, so the width is usually not an issue. Sometimes if my nails are longer, length can be a problem, but this design worked fantastic. Even fit my thumb pretty well!!
But the full nail designs like this that do not need to be perfectly rectangular with straight edges (like a striped one), usually fair better because you don't notice that there may be a gap on either side where the print didn't transfer because the design wasn't wide enough. So overall, this worked great!!

My index finger apparently had problems picking up the design at the tip. Either that or I didn't notice that the stamper never picked up the top part of the design. But if you were curious, the design doesn't end there, I just messed up the stamping and missed that part.
Also know that some of the photos were taken last night right after I did the design, and some were taken this morning. So if there are difference in some of the designs in different photos, that's because I should've used a top coat!!

Tuesday, May 17, 2011

How To: 80s Neon/Bright Leopard Nails Tutorial

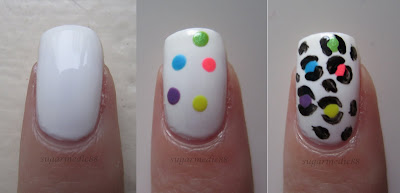
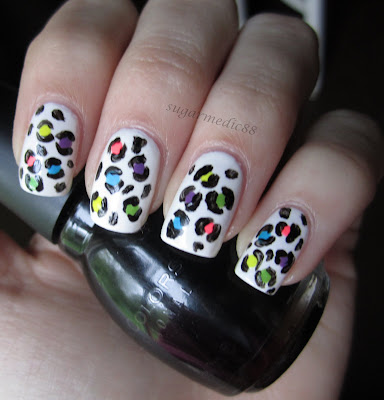
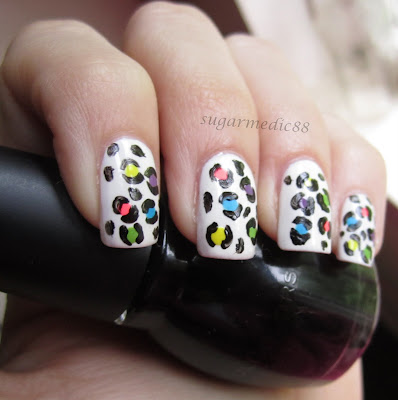
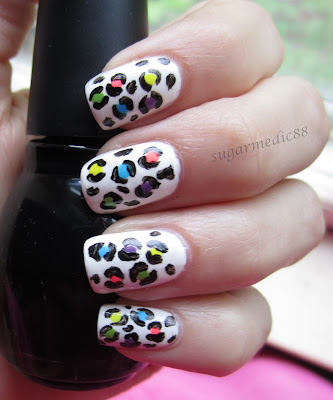
I want to start by saying I did NOT come up with this leopard print idea. I've seen different photos of it here and there. When I got my dotting tools, I decided I'd do it. I can't give credit to one person, as I wasn't looking at a photo when I did it, and had just remembered people doing it and did it myself. So I'm certainly not claiming to have thought of this on my own! I've seen many different versions of this. Some used Konad, some freehand. Some used rainbow base coats, some used all shades of pink, there are a bunch of different ways. But this is my take.

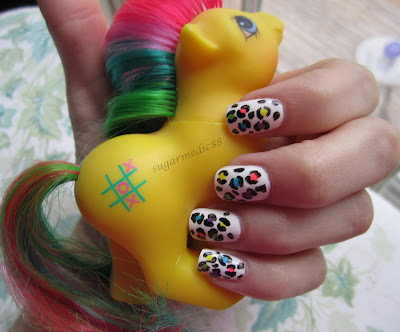
And, because I'm calling this an 80s Leopard Print, what's more 80s than My Little Pony!? So introducing... Baby Tic-Tac-Toe

80s Neon Bright Leopard Print Nails

This would look great on short nails, by the way!! But if this is too loud for you, there are definitely ways to tone it down by using a more neutral base color or more neutral spots. It doesn't have to be this stark white and brightly colored!! Hope you enjoy my little tutorial :)

Polishes and Materials Used:
♥ Sally Hansen Xtreme Wear in White On as a base
♥ Poshe
♥ China Glaze Flip Flop Fantasy (pink)
♥ Ardene Sunshine (yellow)
♥ China Glaze Tree Hugger (green)
♥ Zoya Phoebe (blue)
♥ China Glaze Spontaneous (purple)
♥ Sinful Black on Black (black)
♥ ELF Studio Angled Eyeliner Brush (available in Target stores for only $1)
- You could probably use toothpicks for this if you can't find this brush. But if you like doing nail art or want to give it a shot, I highly suggest investing in this $1 brush while it's available =P
♥ Dotting Tool
- If you do not own a dotting tool, you can use a bobby pin, old pen, or a tootpick. If using a toothpick, I suggest cutting the tip so it's not so pointy. This is allow it to make larger dots.
♥ Cotton Pad with Acetone
♥ Notecard or paper to make dots of polish on

Here's a comparison of some of the around the house tools you can use:


The polishes I'm using:


How to do it:

1. I started with 2 coats White On and 1 coat Poshe (by the way, I REALLY love White On. It's an amazing white)


When using a quick dry top coat like Poshe or Seche Vite, I prefer to wait a while before I use a dotting tool. Just because the polish can still be a little tacky, and you may not get the dot the way you want it.

2. I've already chosen my colors as stated above. I made one dot per nail of each color. (Instead of doing one nail at a time, do all 10 with pink, then all 10 with yellow, etc. to reduce the time it takes to do this).


3. Then, with your brush, you're going to draw little curved lines around two sides of each dot, leaving a gap on either side of the lines so they do not touch. Once all dots are encapsulated, fill in gaps with random black splotches with your brush.*

80s Neon Bright Leopard Print Nails

*Keep a cotton pad with acetone next to you. Wipe your brush off on the pad after each nail or as needed so the brush doesn't become stiff due to dried polish. It's ok if it because a little stiff, because it prevents it from spreading very wide so you can draw a thinner line and have more control.
Another recommendation is when you're making a dot of polish on your notecard or paper, don't keep putting it in the same spot when it starts to dry. It will stay tacky if you do that and your brush won't always pick up just the fresh liquid polish.

Here's my workspace after everything was done. You'll see the cotton pad with brush marks and different dots of color all over the notecard. FYI, you see colors I didn't use because this is the same card I used for my Camo Nails:


I didn't use a top coat in these photos, but if you want to, wait a little while and top with a top coat if you choose, and you're done!!

80s Neon Bright Leopard Print Nails

80s Neon Bright Leopard Print Nails

80s Neon Bright Leopard Print Nails

80s Neon Bright Leopard Print Nails

80s Neon Bright Leopard Print Nails

80s Neon Bright Leopard Print Nails

And because I just can't get enough of Baby Tic-Tac-Toe...

80s Neon Bright Leopard Print Nails

80s Neon Bright Leopard Print Nails

And for my awesome followers/readers, I suppose I should mention where I came up with a My Little Pony. Well, I've been collecting them for a... VERY long time. I had them when I was a child, and when I was about 9, I would buy them when I saw them at yard sales. By 11, I was purposely going to Goodwill and flea markets hunting for them. By 12, I was having my mother bid on ponies on eBay. My collection is currently stored away and apart from stumbling across a pony or two here or there, I am on a collecting hiatus. I have hundreds of ponies, I believe my last count was around 400. I only collect the old ones (from the 80s and early 90s), but I do have a few newer ones as well. So there. Just a little more about me!!