Pages

Showing posts with label Black. Show all posts

Tuesday, March 13, 2012

OPI Tease-y Does It

The last time I wore this polish was over a year ago when it came out. It's from the Burlesque collection that way released last winter. I picked it up on clearance at Ulta. The reason I haven't worn it since was because I really did not like it when I first wore it and saw no reason to really wear it again (I'll go into that after the photos). But anyway, here it is. Giving it another shot.


OPI Tease-y Does It

OPI Tease-y Does It

OPI Tease-y Does It

OPI Tease-y Does It

OPI Tease-y Does It

OPI Tease-y Does It


Bottle Shot

IMG_3682


2 coats OPI Tease-y Does It
1 coat Poshe

Tease-y Does It has a deep black/brown base with a deep pink/red shimmer with very minimal flashes of a golden shimmer. Disappointingly, this polish looks a lot more dynamic and lovely in the bottle. I should add a disclaimer. Vampy, deep colors are not my favorite. I'm sure that this is an amazing polish for those who like blackened colors. But the bottle shows significantly more shimmer with a dark pink to gold shift that doesn't translate as well on the nail. The shimmer is not very apparent. I tried to get the polish at a ton of different angles to show that there is a bit of shimmer. But I think the first photo is more accurate at how dark and... plain this polish really is. Nothing like the bottle. :(

The reason I didn't like this polish the first time was because I remember I had gone out with a bunch of coworkers and I had at LEAST 3 people comment on my "black" nails. I mentioned it's not black, but in the lighting we were in, you couldn't tell there was anything more to it. It just annoyed me because I spent money on what looks like a "black" polish to other people... and to me. That's why I didn't bother to wear it again.

If you've read my blog, you know I don't like OPIs brushes. Apart from that, the formula was perfect, opaque in 2 coats. It seemed to migrate a LITTLE towards my cuticles, but stopped before it got there. It was kind of funny, actually!

While I wasn't a fan of this polish, I just want to reiterate that if you like these nearly black colors, I'm sure you'd find this one beautiful!!

Wednesday, December 7, 2011

Swirly Stamped Mirror Mirror

I was going to just do a fun top coat over Orly Mirror Mirror for something fun. Then I decided stamping with black would be PERFECT! I found the designs I wanted to use, then went from there! Here's what I came up with.


Mirror Mirror 7

Mirror Mirror 4

Mirror Mirror 1

Mirror Mirror 3

Mirror Mirror 2

Mirror Mirror 8


2 coats Orly Mirror Mirror
1 coat Poshe
Swirl stamping with bundle monster plate BM-201
-Black is Sinful Black on Black
-Silver is Pure Ice Silver Mercedes
Stamping on ring finger with Essence stamping plate
-Black is Sinful Black on Black
1 coat Poshe

Yup! I top coated it... well, some of the photos have a top coat. I took photos beforehand in case the top coat smudged the design. But it didn't! So I retook a few more photos with the top coat.

My initial intention was to make this kinda subtle. Obviously that went in a different direction! The silver didn't contrast the way I wanted it to, so I decided to do the rest of the swirls in black because I didn't want to bring a vibrant color into the design. I left the silver on my ring finger and decided you couldn't see the silver well enough and it looked like I forgot to stamp a nail. I had my Essence stamping plate right next to me, picked a design off of it, and went with it!

I think it looks really pretty. I'm a sucker for whimsical, swirly designs (obviously) so I really like it! What do you think? Should I have gone with a pop of color? Is there just too much going on? Lemme know!!

Saturday, November 26, 2011

Revlon Facets of Fuchsia

I usually don't wear glitters because I frequently have silk wrapped nails. Removing glitters is laborious anyway, but it just plain SUCKS when you can't use acetone because of a silk wrap. Well, all of my silk wraps are off (not by choice), so I'm going on a glitter spree!!


Revlon Facets of Fuchsia

Revlon Facets of Fuchsia

Revlon Facets of Fuchsia

Revlon Facets of Fuchsia

Revlon Facets of Fuchsia

Revlon Facets of Fuchsia

Revlon Facets of Fuchsia


2 coats Revlon Facets of Fuchsia
1 coat Poshe

I saw people going CRAZY over this polish (and the other two that came out with it), and it looked really pretty for fall so I figured I'd give it a shot. I actually loved it and now want Blue Mosaic (but not gonna lie, I think Starry Pink is hideous).

Facets of Fuchsia is a lovely polish with tiny round and larger hex purple/fuchsia glitter appropriately suspended in a black jelly base. It's a fun balance of glitter in polish because it's not a BAM in your face glitter, but it's not so sparse that it barely looks like glitter. The jelly base is great because it really helps to give dimension to the polish. The other thing I loved was because of the depth of the polish, it isn't one that just looks black from far away. It's obvious enough that there's glitter and it's not just black.

The formula was actually great! I spent very little time trying to make sure glitter was placed evenly because it did it on its own. It was totally opaque in 2 coats and had no streaking or anything. A great formula for a pretty polish!

Wednesday, October 26, 2011

Nails Inc. Magnetic Polish Houses of Parliament

So I was at Sephora with my friend who is super familiar with my polish hunting excursions. She had actually dragged me into Sephora in NYC because they sell Illamasqua polishes. But I happened to wander into Sephora with her the other day and totally forgot that they started selling the magnetic Nails Inc. polishes!! So I picked up Houses of Parliament and skipped Trafalgar Square. And of course none of the Sephoras directly around me sell other non-magnetic Nails Inc. polishes. Eh, that's ok. I'm loving this one!!

**Just as a heads up, I decided to shorten my nails a week prior to my move due to packing. I'd rather my nails get shorter on MY terms than have them break in the moving process. The heads up part is because subsequent posts will show my nails longer than this. That's because I'm kinda backlogged with my photos I've been so insanely busy!! Anyway, onto the polish...


Nails Inc. Houses of Parliament

Nails Inc. Houses of Parliament

Nails Inc. Houses of Parliament

Nails Inc. Houses of Parliament

Nails Inc. Houses of Parliament

Nails Inc. Houses of Parliament

Nails Inc. Houses of Parliament


1 base coat Houses of Parliament let dry
1 coat House of Parliament with use of magnet
1 coat Poshe

Some other photos really quick:

Bottle

Nails Inc. Houses of Parliament Bottle


Cap with Magnet

Nails Inc. Houses of Parliament Magnetic Cap


Directions

Nails Inc. Houses of Parliament Directions


So. I tried doing this with just one coat because the polish is fairly thick. The problem I ran into was the design just didn't come out as vibrant and didn't have the depth I knew it could. I'm thinking you might be able to use a black base or a vampy, deep purple base so as not to waste the magnetic polish (it's 10mL instead of the 15mL most other polishes are). But I figured what the heck for this time around.

The polish is very awesome in real life. It almost seems to move when you bend your fingers. It's not dull by any means. It reminds me almost of those cards or toys where you move it back and forth and it has two different designs. No idea what they're called.

The biggest problem I had was I kept bumping my nails on the magnet!! My nails are not that flat, they're fairly convex as seen here in my Newspaper Nails Tutorial. This made it kind of a pain, even with the little lip they provide on the magnetic cap.

So how this works is the magnet pulls (in this case) black pieces away from the purple to create the design. The magnetic cap is a vanity cap, so it just pulls right off. When you apply your second coat (the wet coat), make sure you're coating the nail well. This polish is thicker and while it is definitely manageable, it's not super easy. If you miss a spot, it won't be a part of the magnetic design. As soon as you apply the second coat of polish, you put the magnet to your nail. Within seconds, literally, the design is formed. I left the magnetic to each nail for about 10-20 seconds (the directions state 10-15 seconds). I think even that was a little long because there was no different between the 10 second ones and the 20 second ones. You can watch from the side and see that the pattern being formed immediately. Also, once the pattern is done, you cannot change it, meaning you can't rehold the magnet to the polish and it will move the particles again.

I had no problems with the design not forming unless I didn't put wet polish in an area on my nail.

In the photos, I had knocked my index finger on the side of my other hand when I was putting on the top coat. I was almost complete with all my nails, so I just left it. I found that when this happens, the black particles are what lifts of the nail before the purple base. Just in case you were curious. Lol.

Tuesday, August 9, 2011

Paintball Nails

Ok, so better known as a splatter mani. I chose the title Paintball Nails because my boyfriend did all the splattering, he plays on a paintball team, and he mentioned how it was like being splattered by paintballs. If you're curious, I used this awesome tutorial by The PolishAholic.


My boyfriend and I both mutually agree this is the best nail:


It's actually on my right hand, but I am terrible at taking photos of that whole hand (really, I tried), so I did just the nail.

2 coats Sally Hansen Xtreme Wear in White On
1 coat Poshe
Black - Sinful Black on Black
Purple - China Glaze Spontaneous
Pink - Orly Basket Case
1 coat Poshe

Instead of dipping the straw into polish, we ended up just painting the polish onto the end of the straw and we had much better luck with that. He held the straw kinda far away, which gave more of a speckled look than big splats of polish.

Monday, July 25, 2011

Zebra With Some Accents

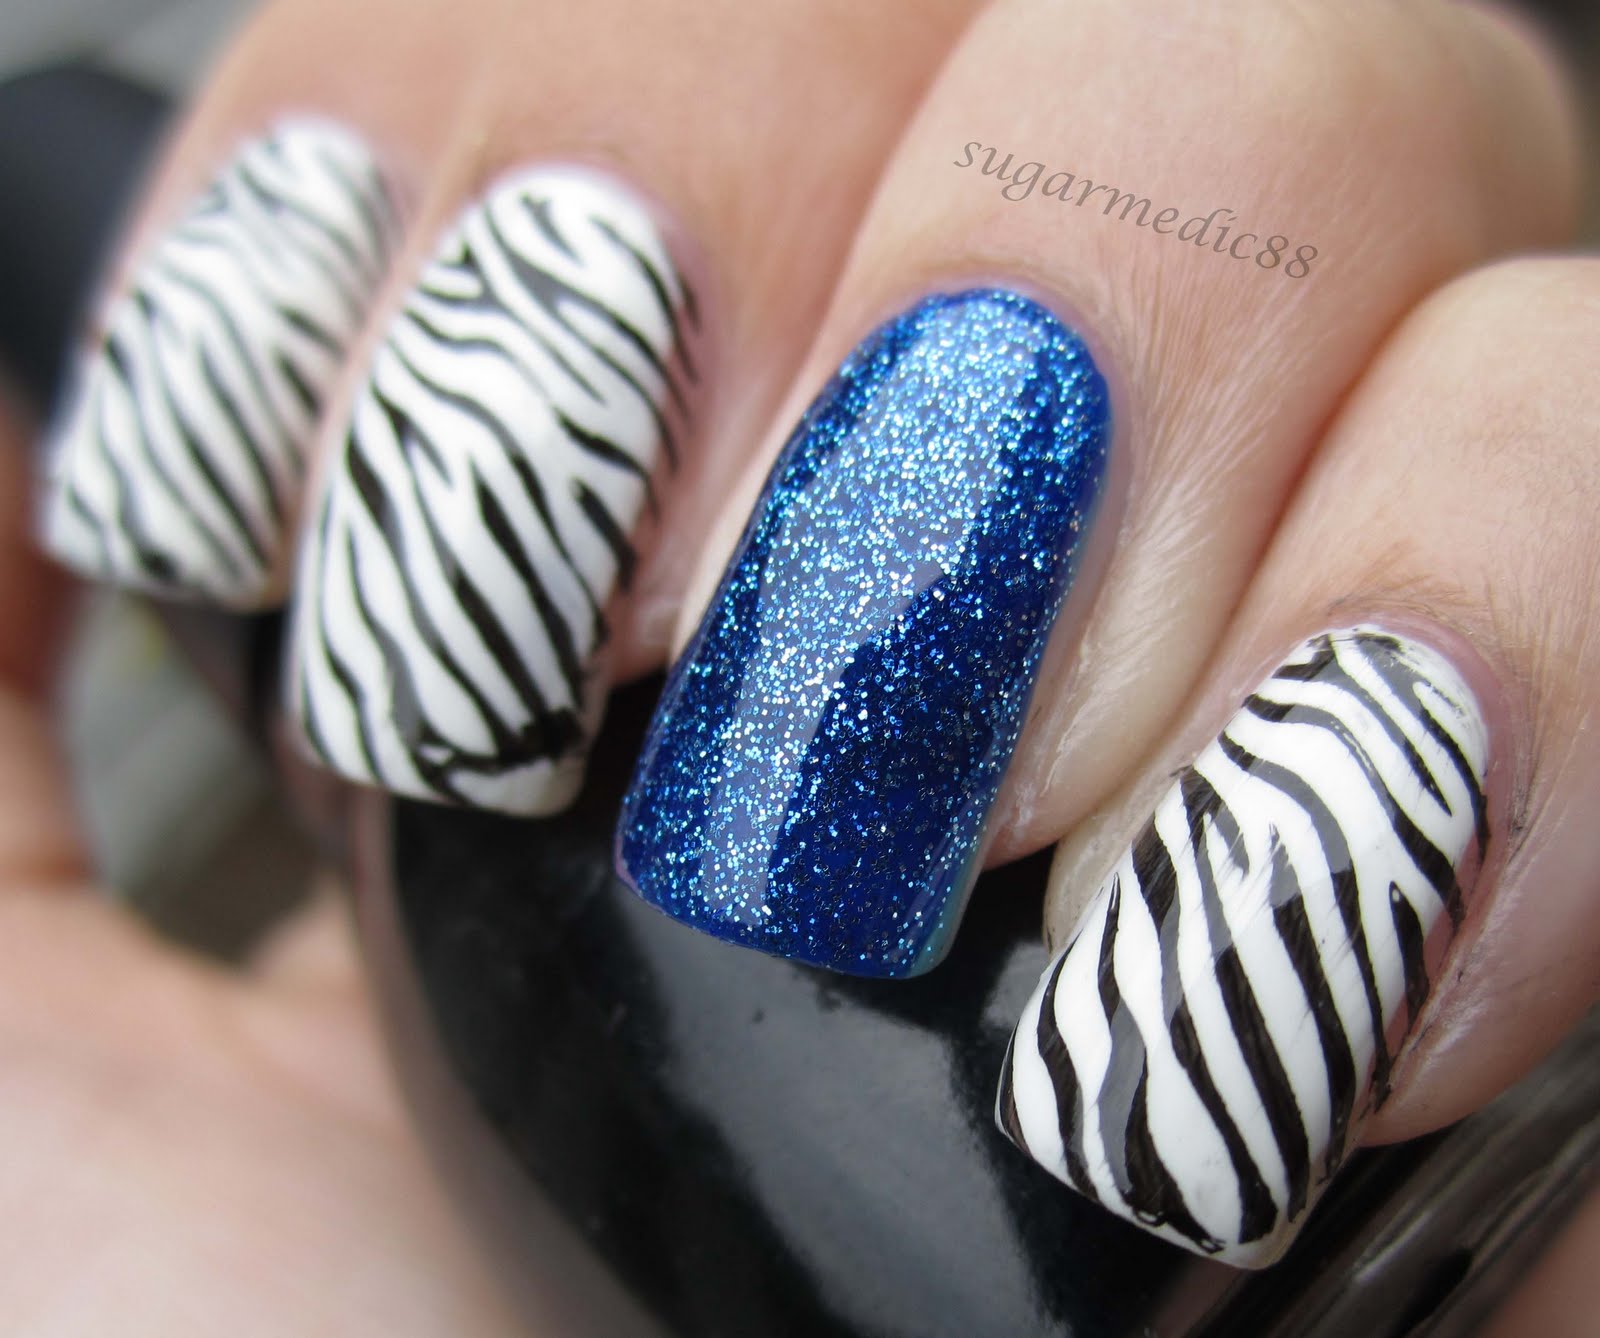
Another day of no idea what to do. I texted my friend this morning whining about how I had NO idea what to do with my nails today. She suggested houndstooth, so I had a go with my old BM plates, which are typically fine in width... however my nails are far too long to do that right now. I needed to try something else. I already had my nails painted white, so this is what I came up with...


Started with:
2 coats Sally Hansen Xtreme Wear in White On
1 coat Poshe

Pinkie, Middle, Index:
Bundle Monster plate BM-223 (zebra) stamped with Sinful Black on Black
1 coat Poshe

Thumb:
Bundle Monster plate BM-223 (zebra) stamped with Orly Royal Navy
Bundle Monster plate BM15 (feather) stamped with Sinful Black on Black
1 coat Poshe

Ring:
1 coat Orly Royal Navy
3 coats China Glaze Dorothy Who?
1 coat Poshe

Oh yeah. How amazingly tacky is this?? I'm all about it, obviously. I messed around with so many different ways of doing this because I had only an iffy vision of what I wanted. Plain zebra stripes was not an option. I debated about doing something red over the zebra (maybe a red rose or something like that), but then I saw Dorothy Who? and decided I had to go with blue. I chose Royal Navy as the zebra on my thumb simply because the feather didn't work over black, even when stamped with a dark, opaque blue (not Royal Navy). The feather, by the way, has zero significance. I just wanted something that wasn't too complicated, and was dense enough to go over the zebra stripes so you would still be able to figure out what it was.

Speaking of the friend I was texting, she doesn't get to see it until tomorrow. Unless she can find my blog. I think only one of my friends has seen my blog. And in case he comes across it again...
HI JIM!!!!!!!!!

Monday, July 18, 2011

The Blue Holo Leopard

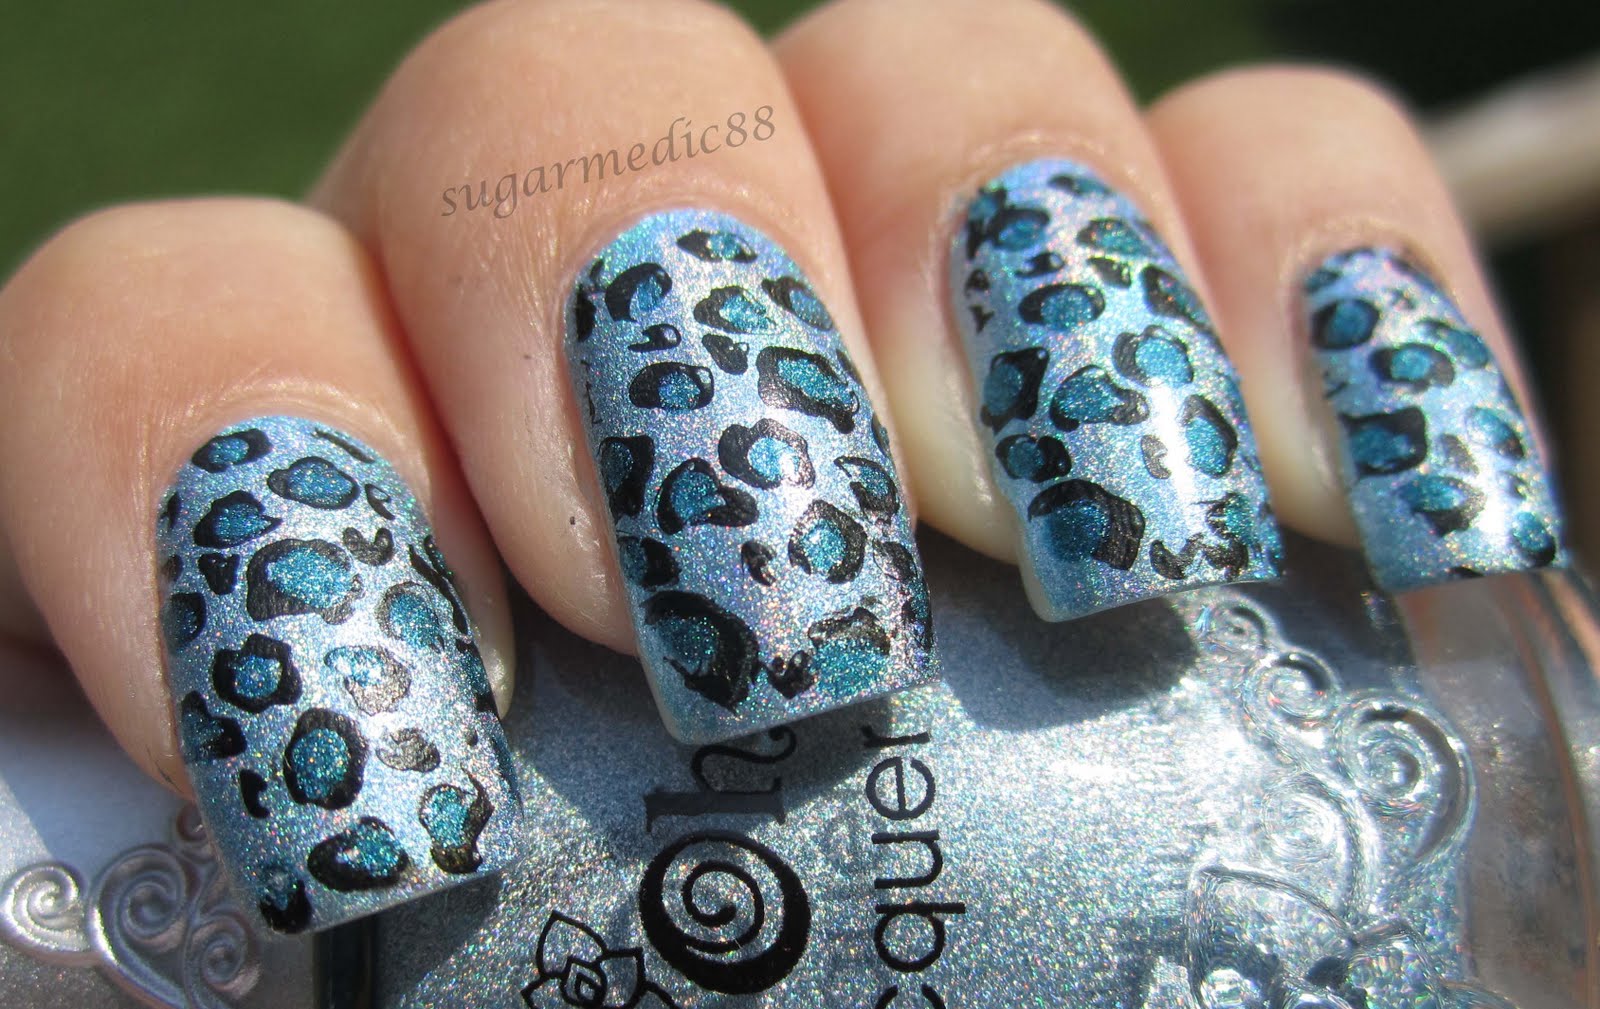
So yesterday, I was dead set on what I wanted to do for my nails today. This morning, I was still going to do it. Then I was setting up to do it and questioned if that's what I wanted to do. Because I'm using a linear holo as a base, I then started having doubts about doing a full nail stamp in case it totally covered the linear awesomeness. So I actually googled photos of the bundle monster plate I wanted to use to see if it really covered polishes that much. I even found one using a scattered holo. Ultimately, I figured eh, oh well if it ruins the linear look. It's supposed to rain at 1300 today, anyway.

So this is what I did...


4 coats Nfu Oh 65 (I added another this morning to freshen it up because I didn't use a top coat)
Bundle Monster plate BM-221 with Sinful Black on Black
Dotting with China Glaze Techno Teal

So I realized how nerve wracking stamping was going to be, and became super weary. Because I have FOUR coats of polish on with no top coat and I'm using black to stamp a full nail design, there is little room for error. There was much potential for this to be very time consuming, but I got WICKED lucky and didn't have to redo any. My right hand thumb didn't stamp as vividly as all of my other nails, but it's still fine!!

I had debated about doing the dots on the print because I didn't know if it'd ruin it. But then I thought back to the Revlon Electric stamped flowers saga (here, here, and finally here), and figured what the heck? Might as well. So if you were curious what it looked like without the dots, I did take photos, and here they are:


Now Be Honest
Do you like it better with or without the dots??