Pages

Showing posts with label Dotting. Show all posts

Thursday, January 31, 2013

Purple Polka Dots

So these are kind of default nails. I started with China Glaze VIII because I figured a nice, rich color would be nice. I hadn't worn one in a while. Everything looks gorgeous and dark purple after the first coat. Then as soon as I applied to second coat I knew it was WAY too dark.
For those of you who have followed my blog for a while, you may know that I hate the dark vampy colors that just straight up look black. If I wanted black, I'd wear black, not super dark purple that looks black. But I will say this polish came off RIDICULOUSLY easy. No staining, smudging, nothing like that. Way easier to remove than your typical black. So that's a win.

Anyway, because the purple was SO dark, I wanted to so some sort of nail art with lighter purple. I knew stamping was out because I have no lighter purples that would've remained opaque enough stamped over VII. My initial plan had been to do a gradient with sponge stamping. Then I realized I had no sponges. So this is what I came up with.


2 coats China Glaze VIII
Lightest Purple - Sally Hansen CSM Lavender Cloud
Medium Purple - Essie Nice Is Nice
Darker Purple - Sally Hansen CSM Good To Grape

I'm sure you'll notice my ring finger is fairly different. This was the first nail I did, and I initially planned to use Nice Is Nice as the lightest, China Glaze Spontaneous as the darkest, and then mix the two before dotting them for the middle color. I quickly realized that was far too much work, and decided to scrap that idea. So that nail is the odd ball and I just didn't bother to redo it. Eh, oh well! Consider it my "accent nail".
And just so you don't think you're going mad, the photos have my left and right hand, so that's why one of my ring fingers is normal.

Monday, March 5, 2012

Silver with Purple Dots

Sorry for the lame title. No idea what else to call this. I'm pretty excited because this idea just sorta came to me. Lately, I haven't been too creative when it comes to thinking up nail art ideas. Not that is this particularly creative, but it was fun to poke through my helmer and as I picked up polish, this idea slowly emerged. And I'm pretty happy with it!!


Silver with Purple Dots

Silver with Purple Dots

Silver with Purple Dots

Silver with Purple Dots

Silver with Purple Dots


1 coat China Glaze Icicle
1 coat Best Topcoat (trying out a new topcoat)
Lightest purple/white dots - Sally Hansen CSM Lavender Cloud
Light Purple - Essie Nice is Nice
Dark Purple - China Glaze Spontaneous

This was just sorta fun! I started looking for coordinating purples, figured dots would be neat. Then I was debating different "background" colors. Maybe a pale green or blue. Maybe just white. Then it hit me. Silver. So I went with it!

I just used my set of dotting tools, the same size dotter for every dot. In hindsight, I wished I had positioned the dots a little differently, but I still have the idea in my head (and a fun title for the post!) so I'll try to do that another time :)

Wednesday, February 1, 2012

Gwen Stefani Luxurious Video Nails

So I totally love Gwen Stefani. If I had the money to maintain my hair the way she does, I'd be THAT blonde. I just love her all around. She's adorable. I loved her in No Doubt, love her on her own. Just love her. So if you watch her Luxurious music video, you'll see at the beginning she is getting acrylics and her nails painted. They do a whole little thing all about it with a shot of the polish dripping into the bottle, zooming in on her nails getting painted, etc. It's pretty cute. So I decided I wanted to do my nails just like hers... minus the acrylics of course! So I'm assuming the polish is Essie just by watching shots of it in the video. The video was released in 2005, so it had to be a polish that was out at that time. I concluded there's a good chance it's Wicked. So that's what I went with!


WickedLuxurious1

WickedLuxurious2

WickedLuxurious3


2 coats Essie Wicked
1 coat Poshe
Dotting with dotting tool and China Glaze White on White
Shoulda done a top coat but didn't :(

So here are some shots from the video:


Gwen Stefani Luxurious

Gwen Stefani Luxurious

Gwen Stefani Luxurious

Gwen Stefani Luxurious

Gwen Stefani Luxurious


So, I actually LOVE her accent nails. She has a 5 dots in a circle, and two circles on each nail. The nails she has done are both of her pinkies and her left ring finger. All nails have two circles, but I couldn't fit two circles on my pinkies, so they had just one. If I had super long nails or acrylics, I totally would have done them EXACTLY like hers.
I loved that this video had a good chunk of time focusing on her nails. I would also love to do more music video inspired nails, so if you have a music video that you LOVE the persons nails in, comment and I'll try to figure out a way to match it!

And you know you wanna watch the video...


Tuesday, December 13, 2011

Poison Apple Snowy Scene

This was not initially what I had planned. I wanted to do more realistic colors (e.g. green tree with brown stump), but none of the greens I wanted to use would stamp well over the red, it just wasn't happening. So I ended up just using white. I'll have to try my other idea again with a different base. But this is ok for now.


PoisonAppleSnow1

PoisonAppleSnow2

PoisonAppleSnow3


1 coat Orly Poison Apple
1 coat Poshe
Tree from bundle monster plate BM-205 with Konad White
Snowflake from bundle monster plate BM14 with Konad White
All "snow" is China Glaze White on White and a dotting tool
1 coat Poshe

Not exactly what I wanted. I didn't want to use a dotting tool for the snow on the "ground", but I could not for the life of me find my brush. I think the whole thing looks a little too puffy. I wanted it to be more elegant, and I think it kinda missed that mark. Eh, oh well. 12 more days until Christmas... which means 12 more opportunities to do it better!!

Side note, I'm in LOVE with bundle monster Christmas/winter/holiday themed stamps. They're so just awesome!!

Tuesday, May 31, 2011

One More With Revlon Electric - Retro

So far this is the third thing I've done to build upon my intial mani of just simply Revlon Electric. I had added a white floral bundle monster print the next day. Charlotte Sparkle had made a comment that I should've done the orange dots in the flowers (I had left them just white). Well, she was totally right. I should have:


Closeup


2-3 coats Electric
1 coat Poshe
Stamping done with Konad white polish and BM16
Dots with China Glaze Peachy Keen

There is no top coat over the design, and this is my third day with this mani, so there is a little bit of wear. Luckily, it's MUCH less obvious in real life as opposed to the close up photos. Yesterday was the last day I planned to wear this mani, and I didn't add the orange dots until afterwards. Makes me wanna wear it for another full day with the dots... and I actually think I will. I work tomorrow so if I do a new mani today, it'll have to come off by the evening. I might as well just leave this on!!

I'm really disappointed I didn't do this sooner. I'm sorry these Electric posts have been so repeditive, but hey, at least I'm honest!! Haha. And I hope that things like this help you guys who aren't ready to change your polish but are sick of looking at the same solid color. Add something to it and keep mixing it up!! You don't always have to change your polish to make your nails look different :)

I love the retro feel to this nail. Yesterday it looked lovely and vintage, but now I'm calling it awesome and retro. Just from adding simple orange dots!! I did use a dotting tool to add them, but if you don't have a dotting tool, here is a post I did that listed some other options.

And if you're curious, the Bundle Monster plate I was using I purchased from Amazon.

Tuesday, May 17, 2011

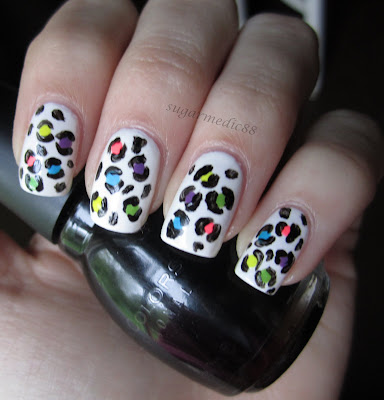
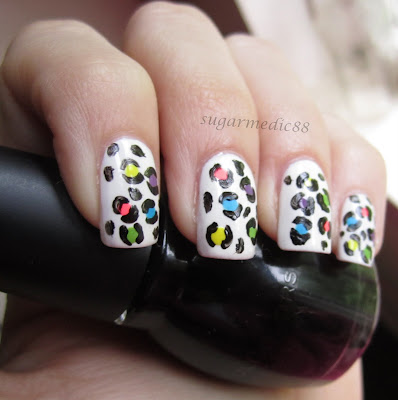
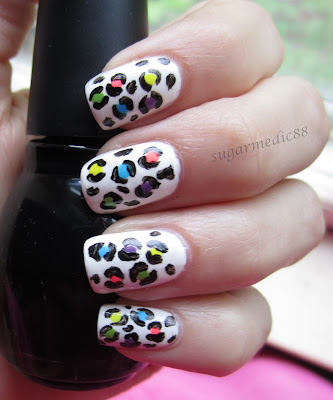
How To: 80s Neon/Bright Leopard Nails Tutorial

I want to start by saying I did NOT come up with this leopard print idea. I've seen different photos of it here and there. When I got my dotting tools, I decided I'd do it. I can't give credit to one person, as I wasn't looking at a photo when I did it, and had just remembered people doing it and did it myself. So I'm certainly not claiming to have thought of this on my own! I've seen many different versions of this. Some used Konad, some freehand. Some used rainbow base coats, some used all shades of pink, there are a bunch of different ways. But this is my take.

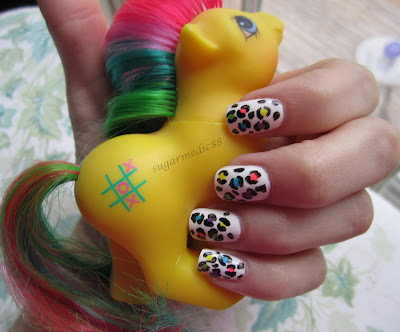
And, because I'm calling this an 80s Leopard Print, what's more 80s than My Little Pony!? So introducing... Baby Tic-Tac-Toe

80s Neon Bright Leopard Print Nails

This would look great on short nails, by the way!! But if this is too loud for you, there are definitely ways to tone it down by using a more neutral base color or more neutral spots. It doesn't have to be this stark white and brightly colored!! Hope you enjoy my little tutorial :)

Polishes and Materials Used:
♥ Sally Hansen Xtreme Wear in White On as a base
♥ Poshe
♥ China Glaze Flip Flop Fantasy (pink)
♥ Ardene Sunshine (yellow)
♥ China Glaze Tree Hugger (green)
♥ Zoya Phoebe (blue)
♥ China Glaze Spontaneous (purple)
♥ Sinful Black on Black (black)
♥ ELF Studio Angled Eyeliner Brush (available in Target stores for only $1)
- You could probably use toothpicks for this if you can't find this brush. But if you like doing nail art or want to give it a shot, I highly suggest investing in this $1 brush while it's available =P
♥ Dotting Tool
- If you do not own a dotting tool, you can use a bobby pin, old pen, or a tootpick. If using a toothpick, I suggest cutting the tip so it's not so pointy. This is allow it to make larger dots.
♥ Cotton Pad with Acetone
♥ Notecard or paper to make dots of polish on

Here's a comparison of some of the around the house tools you can use:


The polishes I'm using:


How to do it:

1. I started with 2 coats White On and 1 coat Poshe (by the way, I REALLY love White On. It's an amazing white)


When using a quick dry top coat like Poshe or Seche Vite, I prefer to wait a while before I use a dotting tool. Just because the polish can still be a little tacky, and you may not get the dot the way you want it.

2. I've already chosen my colors as stated above. I made one dot per nail of each color. (Instead of doing one nail at a time, do all 10 with pink, then all 10 with yellow, etc. to reduce the time it takes to do this).


3. Then, with your brush, you're going to draw little curved lines around two sides of each dot, leaving a gap on either side of the lines so they do not touch. Once all dots are encapsulated, fill in gaps with random black splotches with your brush.*
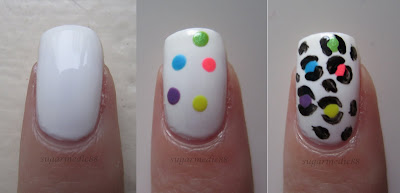
80s Neon Bright Leopard Print Nails

*Keep a cotton pad with acetone next to you. Wipe your brush off on the pad after each nail or as needed so the brush doesn't become stiff due to dried polish. It's ok if it because a little stiff, because it prevents it from spreading very wide so you can draw a thinner line and have more control.
Another recommendation is when you're making a dot of polish on your notecard or paper, don't keep putting it in the same spot when it starts to dry. It will stay tacky if you do that and your brush won't always pick up just the fresh liquid polish.

Here's my workspace after everything was done. You'll see the cotton pad with brush marks and different dots of color all over the notecard. FYI, you see colors I didn't use because this is the same card I used for my Camo Nails:


I didn't use a top coat in these photos, but if you want to, wait a little while and top with a top coat if you choose, and you're done!!

80s Neon Bright Leopard Print Nails

80s Neon Bright Leopard Print Nails

80s Neon Bright Leopard Print Nails

80s Neon Bright Leopard Print Nails

80s Neon Bright Leopard Print Nails

80s Neon Bright Leopard Print Nails

And because I just can't get enough of Baby Tic-Tac-Toe...

80s Neon Bright Leopard Print Nails

80s Neon Bright Leopard Print Nails

And for my awesome followers/readers, I suppose I should mention where I came up with a My Little Pony. Well, I've been collecting them for a... VERY long time. I had them when I was a child, and when I was about 9, I would buy them when I saw them at yard sales. By 11, I was purposely going to Goodwill and flea markets hunting for them. By 12, I was having my mother bid on ponies on eBay. My collection is currently stored away and apart from stumbling across a pony or two here or there, I am on a collecting hiatus. I have hundreds of ponies, I believe my last count was around 400. I only collect the old ones (from the 80s and early 90s), but I do have a few newer ones as well. So there. Just a little more about me!!

Wednesday, May 11, 2011

Dotted Load

I know the title is a little odd. I wanted to title it something besides "Illamasqua Load with Dots" or something similar. So I went with Dotted Load. Haha.

I finally received my new dotting tools on Monday, though I planned to use them on Mother's Day (which was Sunday). Obviously that didn't happen. Thanks USPS for driving my dotting tools up and down New England for 2 days. Anyway, I couldn't use them Monday because I was at work. And on Tuesday, I had really wanted to wear Load on its own. So naturally, Wednesday means dots added to Load!!

If you saw my post with just the swatch of Load, I'm sure you noticed how similar all of the photos were. I purposefully made sure I took photos from a bunch of different angles this time around!! What do ya think??


Closeup


3 coats Load
1 coat Poshe
Larger, outer dots China Glaze For Audrey
Smaller, inner dots Orly Ancient Jade

I've already talked about Load here if you're curious about my opinion of the polish. But as for the dotting, I had no idea what I wanted to do, I just picked up the dotting tool and went for it. Kept it simple but pretty. I just dipped the tool once in polish (for each nail), and did 5 dots, allowing it to become smaller as I went along. Then I used a smaller diameter tool for the inner dots, following the same steps.

Dotting tools are very easy to use. Just take a piece of paper or a notecard or anything like that, and put a dab of polish on it. Then just dip your dotting tool into the wet polish and dot away! If you wanted the dots all the same size, just keep redipping before you do each dot. Or you can do what I did and get a gradient effect after just dipping once and dotting several times after.

Here is a photo of the tools I used:


I bought them from eBay, and if you're curious, you can click here for the auction. I wish I could tell you more about their sizes, but I really don't know. There were 5 tools that came in that auction, but it looks like only 3 different sizes. I'm a little disappointed by that, so keep that in mind if you choose to buy from that auction or the like. It seems like there are other dotting tools out there that mention different sizes and how many different sizes you'll get. Now this is definitely my own fault, as I did not research that well enough. But ultimately, I'm still happy with the tools. They seems like very good quality and they clearly work well. And they were definitely the cheapest ones I came across.