Pages

Tuesday, May 17, 2011

How To: 80s Neon/Bright Leopard Nails Tutorial

I want to start by saying I did NOT come up with this leopard print idea. I've seen different photos of it here and there. When I got my dotting tools, I decided I'd do it. I can't give credit to one person, as I wasn't looking at a photo when I did it, and had just remembered people doing it and did it myself. So I'm certainly not claiming to have thought of this on my own! I've seen many different versions of this. Some used Konad, some freehand. Some used rainbow base coats, some used all shades of pink, there are a bunch of different ways. But this is my take.

And, because I'm calling this an 80s Leopard Print, what's more 80s than My Little Pony!? So introducing... Baby Tic-Tac-Toe

80s Neon Bright Leopard Print Nails

This would look great on short nails, by the way!! But if this is too loud for you, there are definitely ways to tone it down by using a more neutral base color or more neutral spots. It doesn't have to be this stark white and brightly colored!! Hope you enjoy my little tutorial :)

Polishes and Materials Used:
♥ Sally Hansen Xtreme Wear in White On as a base
♥ Poshe
♥ China Glaze Flip Flop Fantasy (pink)
♥ Ardene Sunshine (yellow)
♥ China Glaze Tree Hugger (green)
♥ Zoya Phoebe (blue)
♥ China Glaze Spontaneous (purple)
♥ Sinful Black on Black (black)
♥ ELF Studio Angled Eyeliner Brush (available in Target stores for only $1)
- You could probably use toothpicks for this if you can't find this brush. But if you like doing nail art or want to give it a shot, I highly suggest investing in this $1 brush while it's available =P
♥ Dotting Tool
- If you do not own a dotting tool, you can use a bobby pin, old pen, or a tootpick. If using a toothpick, I suggest cutting the tip so it's not so pointy. This is allow it to make larger dots.
♥ Cotton Pad with Acetone
♥ Notecard or paper to make dots of polish on

Here's a comparison of some of the around the house tools you can use:


The polishes I'm using:


How to do it:

1. I started with 2 coats White On and 1 coat Poshe (by the way, I REALLY love White On. It's an amazing white)


When using a quick dry top coat like Poshe or Seche Vite, I prefer to wait a while before I use a dotting tool. Just because the polish can still be a little tacky, and you may not get the dot the way you want it.

2. I've already chosen my colors as stated above. I made one dot per nail of each color. (Instead of doing one nail at a time, do all 10 with pink, then all 10 with yellow, etc. to reduce the time it takes to do this).


3. Then, with your brush, you're going to draw little curved lines around two sides of each dot, leaving a gap on either side of the lines so they do not touch. Once all dots are encapsulated, fill in gaps with random black splotches with your brush.*

80s Neon Bright Leopard Print Nails

*Keep a cotton pad with acetone next to you. Wipe your brush off on the pad after each nail or as needed so the brush doesn't become stiff due to dried polish. It's ok if it because a little stiff, because it prevents it from spreading very wide so you can draw a thinner line and have more control.
Another recommendation is when you're making a dot of polish on your notecard or paper, don't keep putting it in the same spot when it starts to dry. It will stay tacky if you do that and your brush won't always pick up just the fresh liquid polish.

Here's my workspace after everything was done. You'll see the cotton pad with brush marks and different dots of color all over the notecard. FYI, you see colors I didn't use because this is the same card I used for my Camo Nails:


I didn't use a top coat in these photos, but if you want to, wait a little while and top with a top coat if you choose, and you're done!!

80s Neon Bright Leopard Print Nails

80s Neon Bright Leopard Print Nails

80s Neon Bright Leopard Print Nails

80s Neon Bright Leopard Print Nails

80s Neon Bright Leopard Print Nails

80s Neon Bright Leopard Print Nails

And because I just can't get enough of Baby Tic-Tac-Toe...

80s Neon Bright Leopard Print Nails

80s Neon Bright Leopard Print Nails

And for my awesome followers/readers, I suppose I should mention where I came up with a My Little Pony. Well, I've been collecting them for a... VERY long time. I had them when I was a child, and when I was about 9, I would buy them when I saw them at yard sales. By 11, I was purposely going to Goodwill and flea markets hunting for them. By 12, I was having my mother bid on ponies on eBay. My collection is currently stored away and apart from stumbling across a pony or two here or there, I am on a collecting hiatus. I have hundreds of ponies, I believe my last count was around 400. I only collect the old ones (from the 80s and early 90s), but I do have a few newer ones as well. So there. Just a little more about me!!

Monday, May 16, 2011

How To: Camouflage Nails Tutorial

Yesterday I described OPI Stranger Tides as a "pale camo, murky sage". The camo description was the inspiration for this nail.


My first attempt I wasn't happy with, and you can see the end result and the steps leading up to it at the bottom. If the first part of this post isn't your thing, maybe you'd like how I did it in the second part.

Polishes and Materials Used:
OPI Stranger Tides (base)
Poshe
Love & Beauty (Forever 21) Camel
Zoya Shawn
Orly Prince Charming mixed with a TINY bit of Sinful Black on Black
Top Coat (Essie Matte About You, OPI Top Coat)
ELF Studio Angled Eyeliner Brush (available in Target stores for only $1)

Obviously very simple. I started with the lightest color and ended with the darkest so I wasn't trying to put light over dark. This is how it progressed after each added color:


I think I put the top coat on too soon, because it did smudge a tiny bit. It's noticeable in the photos, but not noticeable at all in real life.


If you don't like it matte, I added a clear top coat to it to see what it looks like shiny:


This was my first attempt.


So as I'm creating this post, I've already taken off that camo nail, repainted with Strange Tides, and I'm waiting for it to dry. As I look at the photo, it doesn't look that bad, actually.

In this order I used:
Base Coat of OPI Stranger Tides
1 coat Poshe
Love & Beauty (Forever 21) Camel
Zoya Shawn
Orly Enchanted Forest
Orly Prince Charming
OPI Stranger Tides (again)
Essie Matte About You x2

Ultimately, I didn't like it because it wasn't abstract enough. I thought it ended up looking a little too busy. In hindsight, I should've stopped with just the three colors and added a little more Shawn and been done. But instead, I continued with Enchanted Forest, which blended too easily with Shawn. Then I used Prince Charming, which really made it look messy, and to try to offset that, I added more Stranger Tides. I shoulda quit while I was ahead and it was simple. But if you're curious about the steps I did for this nail (maybe you like it?), here's a quick run through. Sorry some photos are somewhat blurry. After Enchanted Forest I knew it was going down hill and didn't concentrate too much on taking nice photos. And you can see that the polish looks chunky throughout the process, but once Matte About You was added, it evens everything out.

Click to to enlarge it if you'd like.

Sunday, May 15, 2011

OPI Stranger Tides

Had NO idea what polish to wear today. It's apparently supposed to be gloomy ALL weak. Ugh. And because I just had to silk wrap, I like to stick with light colored cremes for a little while after I put it on just so shimmer/glitter or dark colors don't get stuck to it before it adjusts to my nail. Sounds odd I know, but just go with it! Haha.

Stranger Tides is part of the Pirates of The Caribbean collection that came out earlier this month. When I initially saw promo pics, I KNEW I wanted Stranger Tides. Then when I finally saw swatches a while ago, I knew I had to have it. I even posted about wanting it April 1st!! So I've been stalking it for a while.

I was freaking out the week before the collection was released at Ulta. Due to my work schedule, I wasn't going to get to Ulta until a few days after the collection was out. I was afraid it would've been sold out!! I walked into Ulta and remembered that this is the Ulta I bought Black Shatter at 3 weeks after it came out. No one around this Ulta follows polish, clearly. So they had 2 full displays of Silver Shatter save 1 or 2 bottles, and had every other color from the collection as well. Because I had a $5 off $10 coupon (as did my Mom, who I went with) I decided to grab 4 polishes from the collection and I saved $10 total, making each polish only $6!! Yay!!

So here's Stranger Tides

OPI Pirates of The Caribbean Stranger Tides Swatch

OPI Pirates of The Caribbean Stranger Tides Swatch

OPI Pirates of The Caribbean Stranger Tides Swatch

OPI Pirates of The Caribbean Stranger Tides Swatch

OPI Pirates of The Caribbean Stranger Tides Swatch

OPI Pirates of The Caribbean Stranger Tides Swatch

2 coats Stranger Tides
1 coat Poshe

Ready for it? If you've seen my other OPI posts, you know what I'm about to say. I HATE THAT BRUSH!! When I paint my pinkie, I cannot let the brush spread at all, or it'll get all over my skin. Even when I do the rest of my nails, I have to use the brush so gingerly or it'll get everywhere. Great for my thumb nail and big toe. Even fairly decent for the rest of my toes. Sucky for the rest of my fingers. Despite what it may look like in my photos, I have skinny nails.

So the color. This is a... paler camouflage green? A murky sage green? Yeah, I'll go with both of those. I don't think you can describe this polish one way. So picture a pale camo, murky sage, and you have Stranger Tides. Certainly... strange. And GORGEOUS!! Loving this color. Loved it in the promo, loved the early swatches, love it on my nails!! Very, very interesting.

I'm much happier with the formula of this OPI polish. I'm usually sadly disappointed by OPIs formulas with their newer polishes (b3f). But I had no trouble with this one. Totally opaque in 2 coats, no strokes, nice and even. Had a little cuticle drag on two nails, but I was able to fix it. I think it's just because of my frustration with the brush.

Overall, please do not hesitate to grab this polish if you want it! It's an interesting, different color, and the formula is great! Now if only they'd fix that brush...

Song:
Default - Wasting My Time

Broken Nail :(

This is NOT a fun post :(

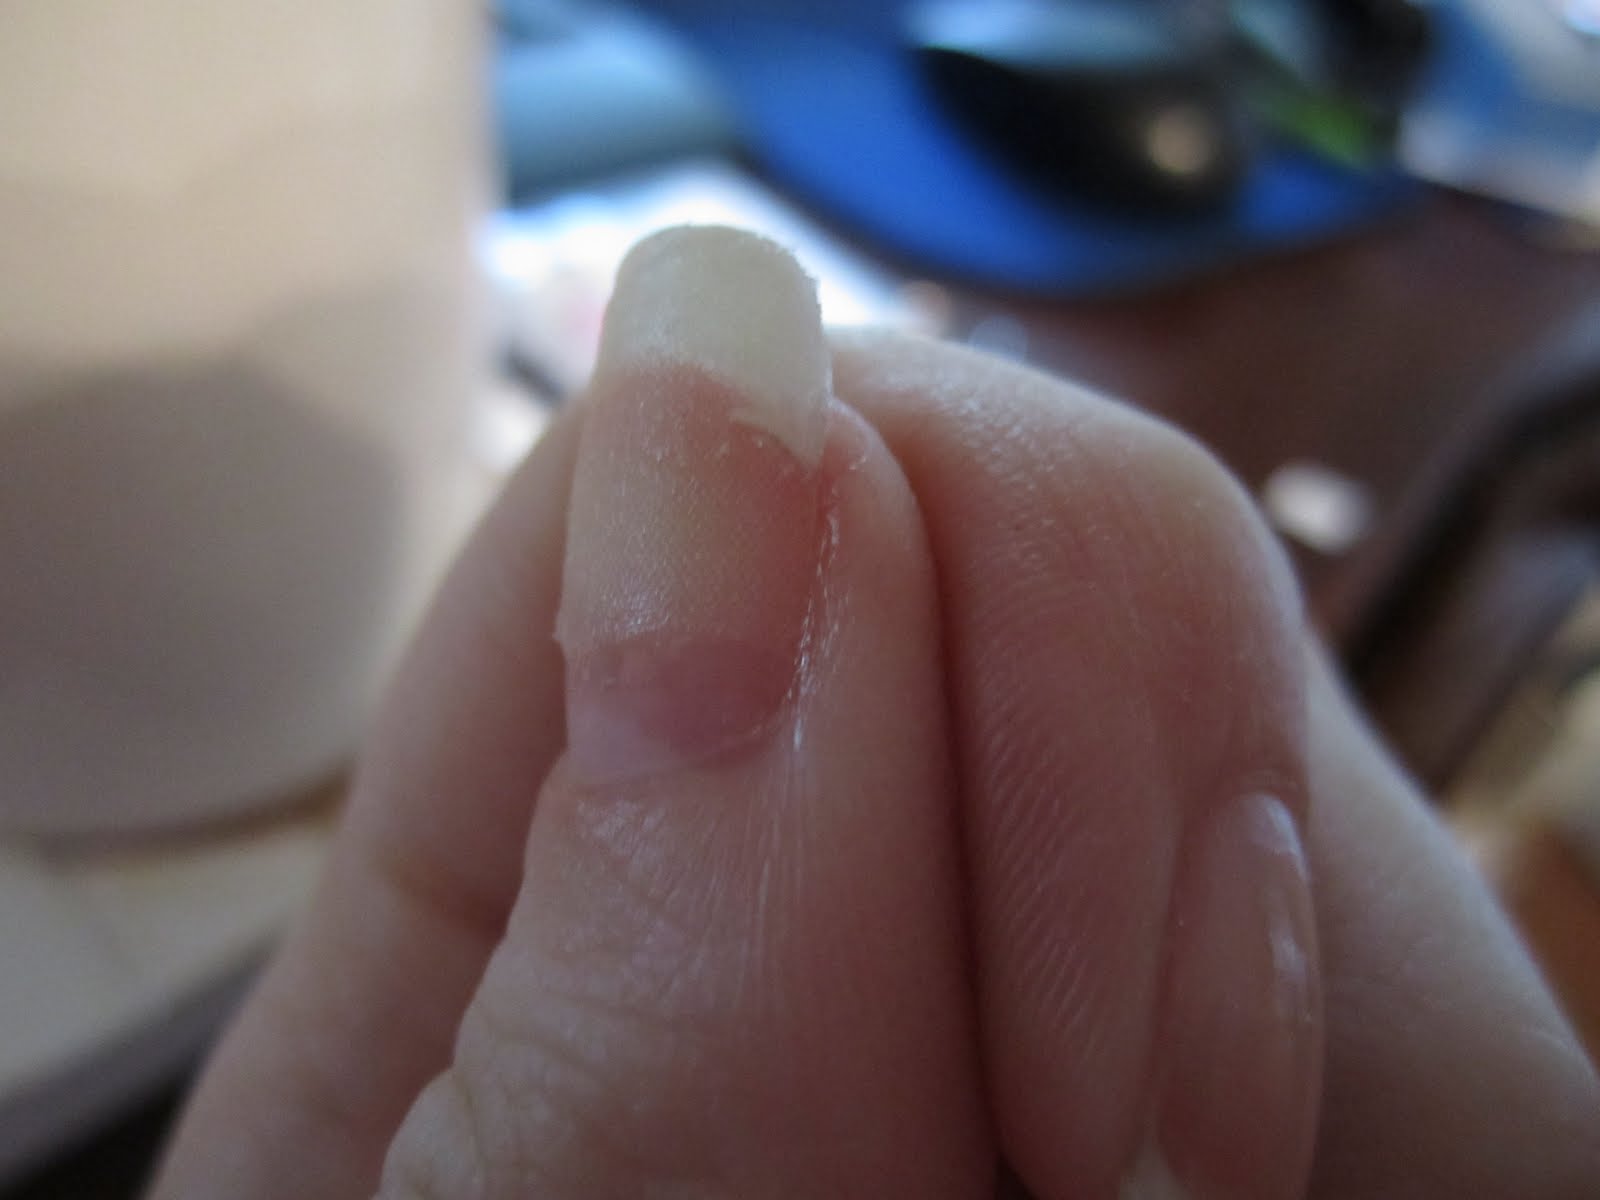
I was doing laundry and the washing machine lid came down and I tried to grab it so it didn't slam, but instead it caught my thumb nail and caused a really low break. It started not too bad, but of course then it went into a full split. So this morning, as I'm typing this, I'm repairing it with a silk wrap. It is WAY WAY too low to cut my nail down. Wanna see the horror?

When it initially happened:


Halfway through my silk wrapping process:


Ugh this stinks!! Beneficially, I never use my thumb in swatch or nail photos, so this shouldn't affect the blog at all. I'm still bummed, though.

Friday, May 13, 2011

Golden Cinnabar with OPI Silver Shatter

My first use of Silver Shatter!! As I've said before, I'm not a huge crackle fan. Black Shatter just didn't do it for me. And I'm convinced it makes my nails look fat. No, really, I swear. But did that stop me from speeding out to go pick up Silver Shatter (and 3 other polishes from the Pirates of the Caribbean collection)? Umm, nope. But I think that's a good thing because I actually like Silver Shatter. Maybe because it's spring, and black doesn't scream "spring" to me the way this silver does. It keeps the nail light and pretty. I'm hoping I like Black Shatter more in the fall. I just tend to follow seasons when I wear polish. In the fall/winter, I'm in the mood to wear darker colors. In the spring, I like pastels, and in the summer I like brights. Slight variations here and there, but you get the idea.

So obviously when I picked up Silver Shatter, I had polish on. So when I got home, I couldn't swatch it on my nails. In hindsight, I could've used a nail wheel, but eh. Oh well. However, my sister was at home with naked nails, so I took advantage of them. I painted 10 random colors on her nails, and Golden Cinnabar was one of them. This ended up being one of my favorite combinations!!


Closeup


2 coats Golden Cinnabar
1 coat Poshe
1 coat Silver Shatter

I know I said I loved this on my sisters nails, but I don't know how much I loved it on mine. Maybe because it didn't crackle super well on all nails, or because my nails are much longer than my sisters.

Thursday, May 12, 2011

Sally Hansen Nail Prisms in Golden Cinnabar

I was initially planning on wearing a holo, but because I was doing my nails before bed, I didn't want to take the chance of it being overcast the next day (By the way, it was amazingly sunny today). So I was going through some of my older, "not salon brand" polishes, and I came across Golden Cinnabar. I bought this about a year ago from Dollar Tree and it came packaged with Sally Hansen Reddy to Mingle. So technically, this cost me 50 cents!! Yay for cheap polish!! And for the record, when it comes to polish, expensive does not equal good quality and cheap does not equal bad quality. You should never assume that because you're paying $8.50... or $14... or even $25, you're getting the best quality polish you can find. You can easily find polishes for $1 that are amazing all around, and you can also buy $25 polishes that are awful in every way. So keep that in mind when you're choosing a polish.

And for the record, despite that I've had this polish for about a year, this is my first time wearing it!! One of the things I love about duochromes is that means I get to take a ton of photos!! Woooooo!!

Sally Hansen Nail Prisms Golden Cinnabar Swatch

Sally Hansen Nail Prisms Golden Cinnabar Swatch

Sally Hansen Nail Prisms Golden Cinnabar Swatch

Sally Hansen Nail Prisms Golden Cinnabar Swatch

Sally Hansen Nail Prisms Golden Cinnabar Swatch

Sally Hansen Nail Prisms Golden Cinnabar Swatch

Sally Hansen Nail Prisms Golden Cinnabar Swatch

Closeup
Sally Hansen Nail Prisms Golden Cinnabar Swatch

2 coats Golden Cinnabar
1 coat Poshe

The Nail Prisms were probably some of the most awesome polishes put out by Sally Hansen. To some, they're probably some of the most awesome polishes put out by ANY nail polish brand. Nail Prisms have since been discontinued :( but you can still find them randomly at discount stores, dollar stores, or online. Some were more holo, some were more duochrome, but regardless they are all gorgeous in their own right.

Golden Cinnabar is a bronze-y/copper-y gold, coral-y rose duochome. The description I give it makes it sound pretty ugly. Haha. But I think it's super intriguing. I'm generally lucky in that I rarely come across a polish that really looks awful with my skintone. Either that or 1. I don't buy colors that clash with my skintone or 2. I just pretend all nail polish looks good on me. Regardless, I can see that this polish may not work with all skintones. I do think, however, that it is a polish that can be easily worn in all seasons.

The formula was great. It seems very thin, but it's totally opaque in 2 coats with no brush streaks. Absolutely no complaints with the formula and application. I'm satisfied :)

Also, I don't have it to compare, but it looks very similar to Nubar Stardust. Maybe a dupe or at least dupe-ish?

Wednesday, May 11, 2011

Dotted Load

I know the title is a little odd. I wanted to title it something besides "Illamasqua Load with Dots" or something similar. So I went with Dotted Load. Haha.

I finally received my new dotting tools on Monday, though I planned to use them on Mother's Day (which was Sunday). Obviously that didn't happen. Thanks USPS for driving my dotting tools up and down New England for 2 days. Anyway, I couldn't use them Monday because I was at work. And on Tuesday, I had really wanted to wear Load on its own. So naturally, Wednesday means dots added to Load!!

If you saw my post with just the swatch of Load, I'm sure you noticed how similar all of the photos were. I purposefully made sure I took photos from a bunch of different angles this time around!! What do ya think??


Closeup


3 coats Load
1 coat Poshe
Larger, outer dots China Glaze For Audrey
Smaller, inner dots Orly Ancient Jade

I've already talked about Load here if you're curious about my opinion of the polish. But as for the dotting, I had no idea what I wanted to do, I just picked up the dotting tool and went for it. Kept it simple but pretty. I just dipped the tool once in polish (for each nail), and did 5 dots, allowing it to become smaller as I went along. Then I used a smaller diameter tool for the inner dots, following the same steps.

Dotting tools are very easy to use. Just take a piece of paper or a notecard or anything like that, and put a dab of polish on it. Then just dip your dotting tool into the wet polish and dot away! If you wanted the dots all the same size, just keep redipping before you do each dot. Or you can do what I did and get a gradient effect after just dipping once and dotting several times after.

Here is a photo of the tools I used:


I bought them from eBay, and if you're curious, you can click here for the auction. I wish I could tell you more about their sizes, but I really don't know. There were 5 tools that came in that auction, but it looks like only 3 different sizes. I'm a little disappointed by that, so keep that in mind if you choose to buy from that auction or the like. It seems like there are other dotting tools out there that mention different sizes and how many different sizes you'll get. Now this is definitely my own fault, as I did not research that well enough. But ultimately, I'm still happy with the tools. They seems like very good quality and they clearly work well. And they were definitely the cheapest ones I came across.