Pages

Showing posts with label Holiday. Show all posts

Thursday, February 16, 2012

Valentine's Day Water Marble

Better late than never!! I'm usually behind on my posting, so naturally this was going to be a couple days late. I did this water marble ON Valentine's Day. I planned to do it the day before, but I had work and class and I'm pretty sure something else. Oh!! (I'm typing out my thoughts lol). That's right. I then ended up going out to lunch with my friends and their INSANELY adorable son who is 8 weeks old. So anyway, long story short, I did the water marble on Valentine's Day and haven't gotten around to posting it until now! So here it is!!


Valentine's Day Water Marble

Valentine's Day Water Marble

Valentine's Day Water Marble

Valentine's Day Water Marble

Valentine's Day Water Marble


My favorite nails

Valentine's Day Water Marble Valentine's Day Water Marble Valentine's Day Water Marble


2 coats China Glaze White on White*
Water Marble colors are
Orly Fancy Fuchsia
China Glaze White on White
Orly Happily Ever After

*So about my base coat. While I started with 2 coats of White on White, there's also a failed mani attempt. You see, I was trying to do a bunch of small, red and pink hearts on each nail over white. Some hearts looked perfect, others not so much. I didn't like it enough to post about it, so I didn't and won't. So I had that on my nails when I went to water marble. I figured why bother repainting my nails white? They're already almost completely white. Well, you can definitely see hearts, or some random red/pink dark spot underneath the water marble in some areas. If you were curious, that's what it was. Don't judge. Lol

Sunday, February 12, 2012

Valentine's Day Glitter Tips

So obviously this isn't specifically a "Valentine's Day only" mani, more of a "Valentine's Day mani IDEA". I know not everyone has stamping plates or other things that I or others may use for a V-day mani. Or maybe they consider it tacky or just want something simple. So all you need for this is a base polish, a glitter polish, and a top coat*!


Revlon Lilac Pastelle with Silver Glitter Tips

Revlon Lilac Pastelle with Silver Glitter Tips

Revlon Lilac Pastelle with Silver Glitter Tips

Revlon Lilac Pastelle with Silver Glitter Tips

Revlon Lilac Pastelle with Silver Glitter Tips


3 coats Revlon Lilac Pastelle
1 coat Poshe
Silver glitter is Ardene Diamonds
1 more coat Poshe*

*I find a top coat necessary because of my technique. If you don't use a top coat, you may be able to see streaks of the clear base of the glitter polish.

I did these just like my China Glaze VIII with Glitter Tips post. Here's how I did it:

1. Paint on your base polish as you normally would.

2. Add a quick dry top coat (which I recommend), or wait until it's dry.

3. Paint the glitter polish just on the tip of your nail.

4. Wipe the brush on the sides of the bottle and gently, use the glitter polish brush to use light, irregular strokes and brush some polish from the tip towards the cuticle.
I don't go all the way to my cuticle. I just sort of gauge how far up I want it.

5. Go over the tip again to make sure the glitter is heavier there to help with the gradient effect.

6. Use a top coat and you're done!!

Tuesday, February 7, 2012

Pretty Valentine's Day Stamping

So I had been wearing Rica and decided I loved it SO much I wasn't ready to take it off. But I hate wearing the same color on its own for a long time. Long time is relevant. For me, a long time is 2 days. Then it hit me! Duh! Valentine's Day!! And stamping is so quick and easy, so out came my plates, and here is the end result...


Rica Valetine's Day Nails

Rica Valetine's Day Nails

Rica Valetine's Day Nails

Rica Valetine's Day Nails

I've decided to start doing farther away hand photos of my nails like Nailtastic because I think it gives a much more realistic view of how the polish looks. More on that later, but here ya go!

Rica Valetine's Day Nails


2 coats Zoya Rica
1 coat Poshe
Stamping with Konad White and Bundle Monster plates BM17 and BM-209
1 coat Poshe (though I think I took the close up photos before putting this one)

I LOVE the way this came out. The foily-ness of Rica with the basic white. The lacy, delicate design and simple accent nails. I wore this mani for... THREE DAYS!! I had Rica on for two days on its own, then this for three days! That totals FIVE DAYS!! I think this might be a record, legit.

Speaking of which, I usually never discuss wear of polish because I never wear it long enough to comment. But as I type this, it's the fifth day and I have no signs of wear or chipping at all. I know people tend to have wear problems with Zoya. Honestly, I never wore a Zoya polish long enough to determine if I had that problem, too. But apparently I don't. Five days going strong! So if you're curious of my base and top coat combo, I used Nail Tek Intensive Therapy II as my base coat and Poshe as my top. Obviously I have two coats Poshe because of the stamping. Sometimes I have problems with a second coat of Poshe causing my polish to peel up pretty quickly. I don't know if this worked out so well because it's not a creme polish, or because it's just a really harmonious combination.
Also, I actually wore this for SEVEN days because I had no time to change or take off my polish, so I painted another color on top of Rica with another coat of polish. No chips with that, either!

Monday, February 6, 2012

Super Bowl NEW ENGLAND PATRIOTS!!

Yesterday was the Super Bowl. I live in Connecticut. If you weren't aware, "Connecticutians" have an INTENSE rivalry when it comes to sports. We are right between Boston and New York. So you can imagine how that works. Red Sox vs. Yankees. Patriots vs. Giants vs. Jets. And people are VERY passionate about their teams. So when the Patriots and Giants were both headed to the Super Bowl, it was gonna be pretty big.

Obviously the game has happened, the Giants won. I, personally, am not a huge sports fan (except hockey!) and don't really follow football. But I was cheering for the Patriots because I was raised a Patriots fan, my boyfriend is a Patriots fan, and eh, I had to choose one!

So of course my nails had to match accordingly. I actually finished these this morning, after the Pats lost :( I tried to finish them up yesterday, but I was so busy getting food ready for the game that I completely ran out of time. I wanted to post these yesterday, but obviously since they weren't done, I couldn't. So here they are!!

Camera Photos

New England Patiots Super Bowl Nails

New England Patiots Super Bowl Nails

New England Patiots Super Bowl Nails

New England Patiots Super Bowl Nails


iPhone Photos
*because it looks much better NOT in macro. This is how it looks in real life. Looks much cleaner.

New England Patiots Super Bowl Nails

New England Patiots Super Bowl Nails


White is China Glaze White on White
Blue is Sally Hansen Thinking of Blue
Red is Orly Poison Apple
Grey was Orly Mirror Mirror, then I went over it with OPI Skull & Glossbones because Mirror Mirror was too dark.

Sunday, December 18, 2011

Gold Holly Stamping

I'm kinda obsessed with Gilty Pleasure for Christmas. It's just such a gorgeous, real gold, I hope I have enough time to use it again in another Christmas design as well. But here is just a quick, simple stamp with Gilty Pleasure.


GiltyPleasureStamped1

GiltyPleasureStamped2

GiltyPleasureStamped3


iPhone photo that I think shows that the stamp was much more opaque than the other photos make it seem

GiltyPleasureStampediPhone


2 coats Sally Hansen Gilty Pleasure
1 coat Poshe
Holly from Bundle Monster plate BM14 with Orly Enchanted Forest for the leaves and Orly Poison Apple for the berries.

I had intentions of putting a tiny red rhinestone in place of the berries. But I realized that I didn't have any and wasn't in a position to be able to go get some. So it stayed as is. Wish I had gotten a chance to do that, though.

Tuesday, December 13, 2011

Poison Apple Snowy Scene

This was not initially what I had planned. I wanted to do more realistic colors (e.g. green tree with brown stump), but none of the greens I wanted to use would stamp well over the red, it just wasn't happening. So I ended up just using white. I'll have to try my other idea again with a different base. But this is ok for now.


PoisonAppleSnow1

PoisonAppleSnow2

PoisonAppleSnow3


1 coat Orly Poison Apple
1 coat Poshe
Tree from bundle monster plate BM-205 with Konad White
Snowflake from bundle monster plate BM14 with Konad White
All "snow" is China Glaze White on White and a dotting tool
1 coat Poshe

Not exactly what I wanted. I didn't want to use a dotting tool for the snow on the "ground", but I could not for the life of me find my brush. I think the whole thing looks a little too puffy. I wanted it to be more elegant, and I think it kinda missed that mark. Eh, oh well. 12 more days until Christmas... which means 12 more opportunities to do it better!!

Side note, I'm in LOVE with bundle monster Christmas/winter/holiday themed stamps. They're so just awesome!!

Monday, October 31, 2011

Halloween Mani 2011 (and SNOW!?)

Thank you New England for merging together fall and winter. I had always wanted to enjoy my Halloween complete with snow covered... leaves. Well anyway, if you're not from New England and you hadn't heard, we got snow 2 days ago. Some places SIGNIFICANTLY more than others. We just got a few inches, but other parts of the state got like 10!? I was working in the northern part of the state when it was snowing on Saturday and there were a TON of car accidents. Nothing serious, just people getting adjusted to driving in the snow again. But it was non-stop!! My house had less snow, but I threw in a photo of my yard today (2 days after snowfall) anyway.

More importantly, HAPPY HALLOWEEN!!!!!! I did nothing due to packing and moving (which happens tomorrow!!) But I obviously had to do my nails! Wanna see 'em?


Halloween Nails 2011

Halloween Nails 2011

Halloween Nails 2011

Halloween Nails 2011


Black nails are 1 coat Sinful Black on Black (I'll stick to my Wet N Wild Black Creme from now on)
1 coat Poshe
Stamped with Pure Ice Silver Mercedes, both the spider and spiderweb came from Bundle Monster plate BM13 (ironially plate 13 lol)
1 coat Poshe

The candy corn ring finger is one coat China Glaze White On White then 1 coat Poshe, taped off to do the middle orange stripe with Petites Mango and another coat Poshe, and taped off again to add the yellow stripe with China Glaze Solar Power and finally 1 more coat Poshe. You may notice my shortened look. This is my nails shortened for the move tomorrow. I had mentioned in earlier posts that I wanted my nails to shorten on MY terms and not by snapping them off while moving.

I love this. I was almost going to tape off my nail to make a triangular shaped candy corn, then I decided I would like it better this way. The idea for the candy corn came after seeing LOTS of other people do it. I just thought it was so freakin' cute.

In my planning for my Halloween mani weeks in advance, I was flipping through my BM plates, I came across the spider web and spider on the old plates, despite the new plates having tons of Halloween-themed stamps. Then, after I knew what I wanted to do, I noticed Scrangie did a similar thing with the spider webs and spider. I was kinda bummed because I really thought at least a part of my mani wasn't going to look just like someone elses, but this someone else happens to be one of the most well known nail bloggers out there!! But I figured eh, it's what I had planned in my head and I really wanted to do it, so I did it anyway.

And my backyard on Halloween...

Halloween Snow

Wednesday, October 12, 2011

Stampin' Some Pumpkin Halloween Nails!!

My first Halloween mani of 2011!! Taking a brief break from the Once Upon A Time collection, this new set of Bundle Monster plates has a TON of holiday designs including a BUNCH of Halloween ones. This is the time of year to use 'em so I'm gonna take advantage!!


Halloween Pumpkin Nails

Halloween Pumpkin Nails

Halloween Pumpkin Nails

Halloween Pumpkin Nails


On my right hand

Halloween Pumpkin Nails

Halloween Pumpkin Nails


2 coats Orly Enchanted Forest
2 coats Illamasqua Load on ring finger
Stamping with Bundle Monster plate BM-224
Orange Pumpkin with Petites Mango
Black Vines with Konad Black Pearl
1 coat Poshe

Kinda bummed the vines smudged after adding the Poshe. I waited a while before putting it on, too, but I think that the Konad polish was just so thick and took so long to dry. The orange pumpkin didn't smudge at all, luckily. And even though it looks very smudged in the photos, it's DEFINITELY not that bad in real life. The macro photos just accentuate it.

I love Load in this mani. It is just a fun bone white color that it totally fits the Halloween theme. And this nail straight up looked like white chocolate. So cool.

I'm not counting this Enchanted Forest as a part of my Once Upon A Time posts because I have other ideas for this polish. I'll post about it again later :) But I wanted to use something besides black because I know I'll be using black for other Halloween nails. I think this fits great!

Thursday, March 17, 2011

St. Patty's Day 5 - Final!!

The final day and... St. Patty's Day!! I will be spending my St. Patty's Day being the DD for some of my friends. What about you??

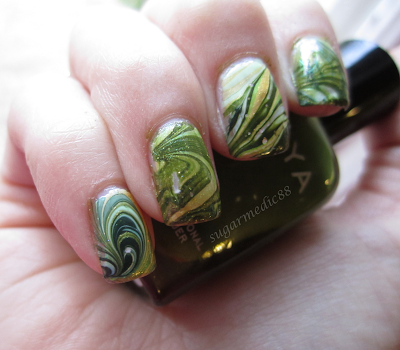
Anyway, I decided to do a water marble of some St. Patrick's Day related colors. And of course that would be green and gold! I had a ton of different ideas planned, and for some reason, didn't execute them throughout the week. At the end of it, I ended up with 2 manis I didn't like and 1 that was just edited from the way before. Like I mentioned, I'm assuming it's because I insisted on using so many light greens. Oh well. There's always next year!!
Onto the mani...

Pre Clean-up/Redos


I ended up redoing a total of 4 of the nails you see. My thumbs were fine so I didn't redo them. Water marbling is exhausting and I hadn't done it in a while, so I half wanted to just leave them as they were. But after a push from someone I showed the picture to, they convinced me to redo the bad ones. With the help of my very artistic sister, I dragged myself over to do them over.

And if you're curious about the little green dots on my fingers, as I said, this is before clean-up. However, the dots are because I used medical tape instead of scotch tape and if you didn't know, medical take has tiny perforations, which apparently lead to tiny green dots all over your fingers when you try to water marble.


Final Mani

Green Water Marble

Green Water Marble

Green Water Marble

Here is the finished mani!! I love how macro shows you all the tiny places you didn't clean up.

If you couldn't tell, I redid my middle finger on my left hand (first two photos), and my pinks, middle, and index finger on my right hand (last photo). I know my ring finger has a dig, but this happened after everything was put away and I could not bring myself to drag everything out and redo it.

What I Used
1 coat Sally Hansen White On as a base
Zoya Shawn
Orly Enchanted Forest
Sinful This Is It
Sally Hansen HD Hi-Def
OPI Gargantuan Green Grape
1 coat SV

I do not currently have the skill to do a repeated pattern, so all of my nails look different. However, I am getting better and hopefully will be able to do actual continuous designs by the summer.

Wednesday, March 16, 2011

St. Patty's Day 4

I don't know what my problem is when it comes to trying to pick good green polishes. I think I just really want it to be spring, so I'm trying to avoid using my darker greens. I'm really disappointed in this mani. While it TOTALLY looks like it gives me lobster hands, it actually doesn't. The lighting is poor because it's taken at nighttime. Busy day!! Anyway, here's the atrocious mani:


1 coat Sally Hansen Lavender Cloud for underwear
2 coats Sally Hansen HD Hi-Def
1 coat Love & Beauty "Light Green"
1 coat SV

To make up for the fact that the mani is so not flattering, I'm posting this old photo of Veruschka, which is clearly what I should've worn today.


1 coat Zoya Veruschka

Tuesday, March 15, 2011

St. Patty's Day Nails

I started doing St. Patty's Day nails on 3/13 and will obviously continue doing so until St. Patty's Day. These are the ones I have done so far:

Day 1


2 coats Finger Paints Chrysanthe-Mum’s The Word.
1 coat Sinful Green Ocean on ring finger.
1 coat SV

Application for CMTW was HORRIBLE! So thick, streaky, goopy, and uneven. Not true to bottle, either. Darker on the nails. I'm really disappointed because I was hoping it was going to be a better version of OPI Gargantuan Green Grape because GGG is so thin and streaky. Apparently you just can't win with these greens. Anyone have any suggestions?

Day 2

This came out a thousand times better than yesterdays mess with FP CMTW.

2 coats Ardene Emerald Green
Lots of coats (like 6) Sinful This Is It
1 coat SV

I was super stubborn about that Sinful polish. It’s the exact polish color I imagined to use for gold for St. Patty’s nails. It’ll probably come up again. It just has that pot-of-gold feel from the shade of golden yellow gold with the perfect shimmer and light, sparse holo microglitter. PERFECT.

Day 3


I was in a wicked rush to get out of the house today, so instead of doing a brand new mani, I added to yesterdays.

As of yesterday:
2 coats Ardene Emerald Green
Lots of coats (like 6) Sinful This Is It
1 coat SV

As of today:
Fauxnad clover design with bundle monster plate BM03 in Ardene Emerald Green
Emerald nails have 1 coat China Glaze Golden Enchantment