Pages

Showing posts with label Purple. Show all posts

Thursday, January 31, 2013

Purple Polka Dots

So these are kind of default nails. I started with China Glaze VIII because I figured a nice, rich color would be nice. I hadn't worn one in a while. Everything looks gorgeous and dark purple after the first coat. Then as soon as I applied to second coat I knew it was WAY too dark.
For those of you who have followed my blog for a while, you may know that I hate the dark vampy colors that just straight up look black. If I wanted black, I'd wear black, not super dark purple that looks black. But I will say this polish came off RIDICULOUSLY easy. No staining, smudging, nothing like that. Way easier to remove than your typical black. So that's a win.

Anyway, because the purple was SO dark, I wanted to so some sort of nail art with lighter purple. I knew stamping was out because I have no lighter purples that would've remained opaque enough stamped over VII. My initial plan had been to do a gradient with sponge stamping. Then I realized I had no sponges. So this is what I came up with.


2 coats China Glaze VIII
Lightest Purple - Sally Hansen CSM Lavender Cloud
Medium Purple - Essie Nice Is Nice
Darker Purple - Sally Hansen CSM Good To Grape

I'm sure you'll notice my ring finger is fairly different. This was the first nail I did, and I initially planned to use Nice Is Nice as the lightest, China Glaze Spontaneous as the darkest, and then mix the two before dotting them for the middle color. I quickly realized that was far too much work, and decided to scrap that idea. So that nail is the odd ball and I just didn't bother to redo it. Eh, oh well! Consider it my "accent nail".
And just so you don't think you're going mad, the photos have my left and right hand, so that's why one of my ring fingers is normal.

Monday, March 5, 2012

Silver with Purple Dots

Sorry for the lame title. No idea what else to call this. I'm pretty excited because this idea just sorta came to me. Lately, I haven't been too creative when it comes to thinking up nail art ideas. Not that is this particularly creative, but it was fun to poke through my helmer and as I picked up polish, this idea slowly emerged. And I'm pretty happy with it!!


Silver with Purple Dots

Silver with Purple Dots

Silver with Purple Dots

Silver with Purple Dots

Silver with Purple Dots


1 coat China Glaze Icicle
1 coat Best Topcoat (trying out a new topcoat)
Lightest purple/white dots - Sally Hansen CSM Lavender Cloud
Light Purple - Essie Nice is Nice
Dark Purple - China Glaze Spontaneous

This was just sorta fun! I started looking for coordinating purples, figured dots would be neat. Then I was debating different "background" colors. Maybe a pale green or blue. Maybe just white. Then it hit me. Silver. So I went with it!

I just used my set of dotting tools, the same size dotter for every dot. In hindsight, I wished I had positioned the dots a little differently, but I still have the idea in my head (and a fun title for the post!) so I'll try to do that another time :)

Tuesday, January 24, 2012

China Glaze VIII with Glitter Tips

As much as I'm not a huge fan of vampy colors, it's winter, and winter is the time for vampy colors (for me anyway)! I don't like when deep colors just look black, so I decided to add some glitter to China Glaze's VIII to help dress it up a little and maybe pull out some of the purple.


VIIIGlitterTips1

VIIIGlitterTips4

VIIIGlitterTips2

VIIIGlitterTips3

VIIIGlitterTips5

VIIIGlitterTips6


2 coats China Glaze VIII
1 coat Poshe
Glitter Tips with Ardene Princess Cut
1 coat Poshe

Now, the glitter is kind of in a gradient form. I didn't use anything special for this, just the brush. I was initially going to just cover the nail in the glitter, but figured I'd mix it up.

The method I used was EXTREMELY easy and you do not need any other supplies besides your polish. I just painted the tip thick with the glitter, wiped the brush on the sides of the bottle to get as much glitter off the brush as I could, then I took the brush and lightly brushed the glitter towards my cuticle. I went over the tip again to make sure the glitter was heavier there. That was it! I did top it with Poshe again because while the glitter dries pretty quickly, there were clear streaks from the base of the glitter. The Poshe just helped smooth it out.

I went a little too heavy on my index finger but didn't feel like fixing it. I was also doing this is very poor lighting so I didn't realize how thick the glitter was at the time. Lol. I did not drag the glitter all the way to my cuticle. I stopped a little bit before that. Had my lighting been better, I would've gone further. But after my index finger getting too much glitter, I figured I'd keep it safe!

Saturday, November 26, 2011

Revlon Facets of Fuchsia

I usually don't wear glitters because I frequently have silk wrapped nails. Removing glitters is laborious anyway, but it just plain SUCKS when you can't use acetone because of a silk wrap. Well, all of my silk wraps are off (not by choice), so I'm going on a glitter spree!!


Revlon Facets of Fuchsia

Revlon Facets of Fuchsia

Revlon Facets of Fuchsia

Revlon Facets of Fuchsia

Revlon Facets of Fuchsia

Revlon Facets of Fuchsia

Revlon Facets of Fuchsia


2 coats Revlon Facets of Fuchsia
1 coat Poshe

I saw people going CRAZY over this polish (and the other two that came out with it), and it looked really pretty for fall so I figured I'd give it a shot. I actually loved it and now want Blue Mosaic (but not gonna lie, I think Starry Pink is hideous).

Facets of Fuchsia is a lovely polish with tiny round and larger hex purple/fuchsia glitter appropriately suspended in a black jelly base. It's a fun balance of glitter in polish because it's not a BAM in your face glitter, but it's not so sparse that it barely looks like glitter. The jelly base is great because it really helps to give dimension to the polish. The other thing I loved was because of the depth of the polish, it isn't one that just looks black from far away. It's obvious enough that there's glitter and it's not just black.

The formula was actually great! I spent very little time trying to make sure glitter was placed evenly because it did it on its own. It was totally opaque in 2 coats and had no streaking or anything. A great formula for a pretty polish!

Wednesday, October 26, 2011

Nails Inc. Magnetic Polish Houses of Parliament

So I was at Sephora with my friend who is super familiar with my polish hunting excursions. She had actually dragged me into Sephora in NYC because they sell Illamasqua polishes. But I happened to wander into Sephora with her the other day and totally forgot that they started selling the magnetic Nails Inc. polishes!! So I picked up Houses of Parliament and skipped Trafalgar Square. And of course none of the Sephoras directly around me sell other non-magnetic Nails Inc. polishes. Eh, that's ok. I'm loving this one!!

**Just as a heads up, I decided to shorten my nails a week prior to my move due to packing. I'd rather my nails get shorter on MY terms than have them break in the moving process. The heads up part is because subsequent posts will show my nails longer than this. That's because I'm kinda backlogged with my photos I've been so insanely busy!! Anyway, onto the polish...


Nails Inc. Houses of Parliament

Nails Inc. Houses of Parliament

Nails Inc. Houses of Parliament

Nails Inc. Houses of Parliament

Nails Inc. Houses of Parliament

Nails Inc. Houses of Parliament

Nails Inc. Houses of Parliament


1 base coat Houses of Parliament let dry
1 coat House of Parliament with use of magnet
1 coat Poshe

Some other photos really quick:

Bottle

Nails Inc. Houses of Parliament Bottle


Cap with Magnet

Nails Inc. Houses of Parliament Magnetic Cap


Directions

Nails Inc. Houses of Parliament Directions


So. I tried doing this with just one coat because the polish is fairly thick. The problem I ran into was the design just didn't come out as vibrant and didn't have the depth I knew it could. I'm thinking you might be able to use a black base or a vampy, deep purple base so as not to waste the magnetic polish (it's 10mL instead of the 15mL most other polishes are). But I figured what the heck for this time around.

The polish is very awesome in real life. It almost seems to move when you bend your fingers. It's not dull by any means. It reminds me almost of those cards or toys where you move it back and forth and it has two different designs. No idea what they're called.

The biggest problem I had was I kept bumping my nails on the magnet!! My nails are not that flat, they're fairly convex as seen here in my Newspaper Nails Tutorial. This made it kind of a pain, even with the little lip they provide on the magnetic cap.

So how this works is the magnet pulls (in this case) black pieces away from the purple to create the design. The magnetic cap is a vanity cap, so it just pulls right off. When you apply your second coat (the wet coat), make sure you're coating the nail well. This polish is thicker and while it is definitely manageable, it's not super easy. If you miss a spot, it won't be a part of the magnetic design. As soon as you apply the second coat of polish, you put the magnet to your nail. Within seconds, literally, the design is formed. I left the magnetic to each nail for about 10-20 seconds (the directions state 10-15 seconds). I think even that was a little long because there was no different between the 10 second ones and the 20 second ones. You can watch from the side and see that the pattern being formed immediately. Also, once the pattern is done, you cannot change it, meaning you can't rehold the magnet to the polish and it will move the particles again.

I had no problems with the design not forming unless I didn't put wet polish in an area on my nail.

In the photos, I had knocked my index finger on the side of my other hand when I was putting on the top coat. I was almost complete with all my nails, so I just left it. I found that when this happens, the black particles are what lifts of the nail before the purple base. Just in case you were curious. Lol.

Tuesday, August 9, 2011

Paintball Nails

Ok, so better known as a splatter mani. I chose the title Paintball Nails because my boyfriend did all the splattering, he plays on a paintball team, and he mentioned how it was like being splattered by paintballs. If you're curious, I used this awesome tutorial by The PolishAholic.


My boyfriend and I both mutually agree this is the best nail:


It's actually on my right hand, but I am terrible at taking photos of that whole hand (really, I tried), so I did just the nail.

2 coats Sally Hansen Xtreme Wear in White On
1 coat Poshe
Black - Sinful Black on Black
Purple - China Glaze Spontaneous
Pink - Orly Basket Case
1 coat Poshe

Instead of dipping the straw into polish, we ended up just painting the polish onto the end of the straw and we had much better luck with that. He held the straw kinda far away, which gave more of a speckled look than big splats of polish.

Thursday, August 4, 2011

OPI Rumple's Wiggin'

I've wanted this polish for-gosh-darn-ever!! From the second I saw it. It's nothing that special, I just wanted it. The last Ulta Rewards I was able to get a polish, and I debated between Rumple's Wiggin' and What's With The Cattitude? Obviously, I went with WWTC. But my boyfriend got me RW for my birthday this year, and I've FINALLY decided to wear it!!

OPI Rumple's Wiggin' Swatch

OPI Rumple's Wiggin' Swatch

OPI Rumple's Wiggin' Swatch

2 coats OPI Rumple's Wiggin
1 coat Poshe

This is a lavender that has some blue undertones. I don't know that it is one of those "bright" pastels, but it's right on that line. I wish I had this in the spring. This late into summer isn't the best time to wear this polish, but whatev!!

The formula was similar to most OPI's. Thinner, opaque in 2-3 coats. Not bad at all! The only thing is this polish REALLY brings out any imperfection on my nails. The ridge down my ring finger is super noticeable, and my silk wraps aren't as hidden as they are with other polishes. I don't know if it's because it's a creme. I don't think so because I've had that pinkie silk wrapped for 2 months (it was a VERY bad break), and this is the most noticeable I've seen it despite wearing lots of cremes.

Thursday, July 7, 2011

A Bad Brush Killed Gray's Anatomy

I actually Konaded on my most recent mani, but I did it at night and never took photos. I have this bad habit of not top coating my Konads, and I went to the beach the next day. I think that explains why I have no photos of it. Lol.

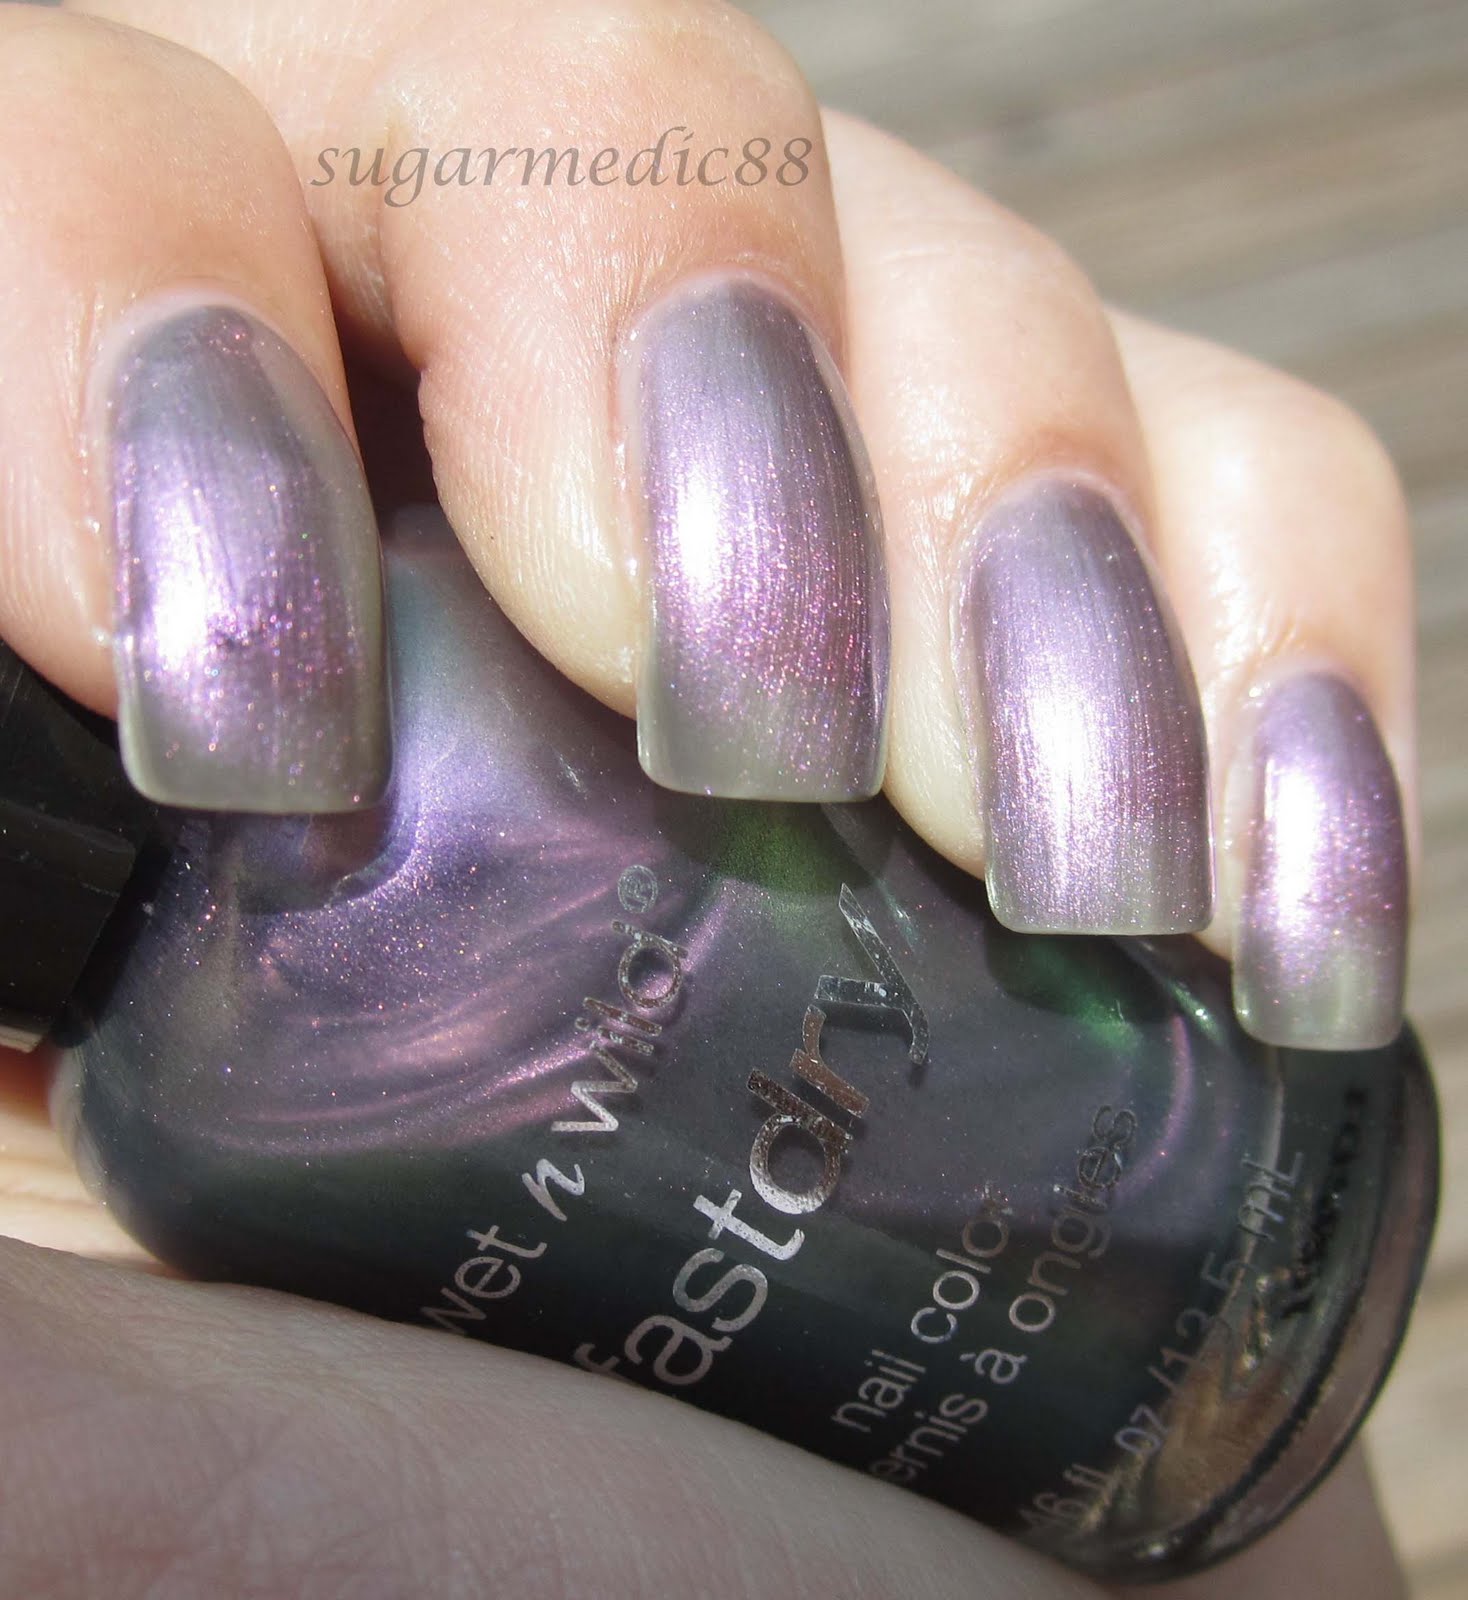
Anyway, I had no idea what I wanted to do to my nails today. I knew I didn't want to wear a creme, which kinda sucked because I actually have a bunch of untried cremes that I've been dying to wear. Then I saw Wet 'n Wild Gray's Anatomy, which is apparently an alternative (but not total dupe) for OPI Not Like The Movies. I do not own NLTM, so I apologize for not being able to offer a comparison, but here and here are blogs with a comparison if you're curious.


Direct Sunlight


3 (thicker) coats Gray's Anatomy
1 coat Poshe

Now, I love duochromes. They're the cloudy day holo IMO. By far one of my favorite finishes. Sally Hansen Golden Cinnabar is one of my favs. This... not even close.

This is a silvery, purple-grey-green duochrome that has visible purple shimmer when in the sunlight. I think this color should have been released in the fall, not spring.

The forumla was WAY too thin. The photos are 3 thick coats, and there is still VNL (visible nail line). I just could not deal with doing another coat. The VNL isn't terribly noticeable in real life, and the duochrome does a pretty good job at camoflauging it. But in the sunlight, it is VERY noticeable, as is the sheerness of this polish.
The worst part was the brush. I do not have any other WnW Fast Dry polishes to compare to this one, but it made application a bigger pain. It flares at the end, is too round, the bristles are too thick so it left very obvious brush strokes, and the bristles are uneven. No thank you. Honestly, if the brush were better, I would have tolerated doing 6 coats if this polish needed it because it really is pretty and I love duochromes. I don't mind doing a ton of coats for a sheer polish, but not with this brush:


It doesn't look THAT bad, but oh it was.

Luckily I work tomorrow, so this mani only has about 9 hours left before it comes off. Which is also why I'm not bothering to redo this or to just do a different mani all together.