Pages

Showing posts with label Nude. Show all posts

Monday, May 16, 2011

How To: Camouflage Nails Tutorial

Yesterday I described OPI Stranger Tides as a "pale camo, murky sage". The camo description was the inspiration for this nail.


My first attempt I wasn't happy with, and you can see the end result and the steps leading up to it at the bottom. If the first part of this post isn't your thing, maybe you'd like how I did it in the second part.

Polishes and Materials Used:
OPI Stranger Tides (base)
Poshe
Love & Beauty (Forever 21) Camel
Zoya Shawn
Orly Prince Charming mixed with a TINY bit of Sinful Black on Black
Top Coat (Essie Matte About You, OPI Top Coat)
ELF Studio Angled Eyeliner Brush (available in Target stores for only $1)

Obviously very simple. I started with the lightest color and ended with the darkest so I wasn't trying to put light over dark. This is how it progressed after each added color:


I think I put the top coat on too soon, because it did smudge a tiny bit. It's noticeable in the photos, but not noticeable at all in real life.


If you don't like it matte, I added a clear top coat to it to see what it looks like shiny:


This was my first attempt.


So as I'm creating this post, I've already taken off that camo nail, repainted with Strange Tides, and I'm waiting for it to dry. As I look at the photo, it doesn't look that bad, actually.

In this order I used:
Base Coat of OPI Stranger Tides
1 coat Poshe
Love & Beauty (Forever 21) Camel
Zoya Shawn
Orly Enchanted Forest
Orly Prince Charming
OPI Stranger Tides (again)
Essie Matte About You x2

Ultimately, I didn't like it because it wasn't abstract enough. I thought it ended up looking a little too busy. In hindsight, I should've stopped with just the three colors and added a little more Shawn and been done. But instead, I continued with Enchanted Forest, which blended too easily with Shawn. Then I used Prince Charming, which really made it look messy, and to try to offset that, I added more Stranger Tides. I shoulda quit while I was ahead and it was simple. But if you're curious about the steps I did for this nail (maybe you like it?), here's a quick run through. Sorry some photos are somewhat blurry. After Enchanted Forest I knew it was going down hill and didn't concentrate too much on taking nice photos. And you can see that the polish looks chunky throughout the process, but once Matte About You was added, it evens everything out.

Click to to enlarge it if you'd like.

Thursday, March 31, 2011

Essie Topless & Barefoot

I was super excited to get this polish. I was looking for a nude polish a few weeks ago for a friends wedding and this was recommended. I had previously seen it at Walmart, so I went down to look for it and they didn't have it. I went to Target, some drugstores, and called 2 Ultas trying to find it, and none of them had it. Where the heck did this polish go, seriously?? So I didn't get to wear it to the wedding, but because I had nothing like it, I decided I had to get it or I'd regret it. So I picked up this ghost polish on Amazon.

Sorry in advance for all of the photos. I just wanted to show the subtle difference in color in different lights, and because I like different angles. And when I want to see swatches, I love seeing more than 1.

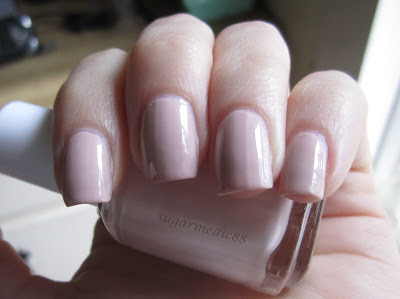
Essie Topless & Barefoot Swatch

Essie Topless & Barefoot Swatch

Essie Topless & Barefoot Swatch


3 coats Topless & Barefoot
1 (VERY necessary) coat SV

Essie describes this as "a barely there soft beige pink". I think they're pretty correct with that description. I would say that while it is pinky, it's not so pink that yellow undertones couldn't wear it. It comes across as more neutral. I don't necessarily agree with calling it "barely there" because that implies to me that it's sheer, and this polish is certainly not sheer.
While I'm intrigued by the color of this polish, I'm disappointed with the formula. If you're familiar with Essie Mint Candy Apple, that is a similar formula. It seems thick, but I don't think it really is, or at least I think thinner is not appropriate. I'm wondering if it has to do with the brush, which doesn't seem to spread out at all. I'm not a fan of large brushes like OPI ProWide, but this was a little ridiculous. It was also fairly streaky, which could be due to the brush. I say SV was necessary because it was slightly uneven, and I specifically included a photo of what I am calling "SV ripple". Which I believe is also me just slapping on SV because I was so annoyed.
I had to be cautious of cuticle drag with this polish, too. Which is another reason it really needed SV. You just had to be very careful with application. Which happens and is fine, but I was trying to hurry up because I had places to go.

Sunday, March 20, 2011

Love & Beauty Nude

This was actually my NOTD yesterday. I don't usually get to wear nail polish on Saturday's because I work every Saturday, however I had yesterday off for a wedding!! My dress was very loud, it was actually this dress from Forever 21:


So I wanted neutral nails. I realized I literally had NO opaque nude nail polish. Nothing even close to it. I had sheer polishes, but they were all unbuildable sheers. I asked on MUA for recs for a nude polish for pale skin. I got some good suggestions, my favorite being Essie Topless & Barefoot. I had seen it at Walmart a few weeks ago, but when I went to look for it, they didn't have it. Neither did Target, drug stores, or 2 Ultas in my area. And I had no time to order the polish. I wasn't impressed by any others, and I didn't want to spend $8.50 on OPI Samoan Sand. I remembered seeing a few neutrals at Forever 21 when I bought my dress, so I wandered myself over there and picked up "Nude" and "Camel". Camel was way too dark for what I wanted, but I felt Nude was totally acceptable!!

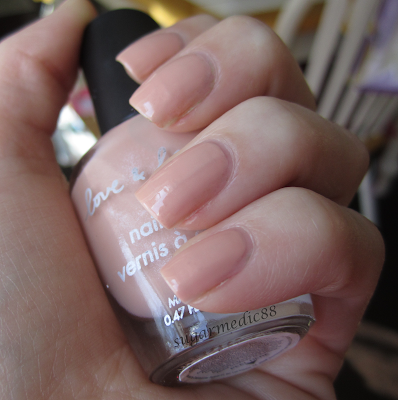
Forever 21 Love & Beauty Nude Swatch

This is 2 coats Love & Beauty Nude
1 coat SV

I had actually wanted something a little lighter and more cream-ish, but this worked well enough.